In the last post, I described how to build the roll using a roll button. But there are reasons to use Custom Roll Parsing instead – the rollTemplate can be shorter, and the method I’m using to create the sheet (using handlebars templating) is easier.
But there are drawbacks too. One you’ll see towards the end of this post, and another is in creating your own custom rolls. The system assumes that every roll is triggered through an Ability – you can’t simply enter text like &{template:ladder} {{stuff}} and expect it to work well. You need to put that text in an ability and then trigger the ability.
But this sheet only has six skill rolls (basically), and they are always used the same way, so this is not a problem. And this process fits the sheet, because its being built with lots of buttons, and users should be used to getting results by clicking buttons. So, lets see what the code looks like for this approach…
The RollTemplate
Whenever you create a custom roll, you need to create the template for how that roll is displayed. This requires both HTML (the function of the roll) and CSS (the styling, how it looks), as well as an understanding of the output generated from the roll.
The HTML template is much shorter, this time, because of Custom Roll Parsing. Values are calculated in the sheet worker, and passed as {{computed::}} properties. Some of the more convoluted Logic Helpers in the original template are eliminated in this way.
<rolltemplate class="sheet-rolltemplate-ladder">
    {{#header}}
        <div class="sheet-header">
            {{who}} rolls {{#skill}}{{skill}}{{/skill}}{{^skill}}a Skill{{/skill}}
        </div>
    {{/header}}
    <div class="sheet-content">
        <div class="sheet-key">{{#skill}}{{skill}}{{/skill}}{{^skill}}Ability{{/skill}}:</div>
        <div class="sheet-value">
            {{computed::score}} {{#rollGreater() modifier 0}}+{{modifier}}{{/rollGreater() modifier 0}}{{#rollLess() modifier 0}}{{modifier}}{{/rollLess() modifier 0}}
        </div>
        <div class="sheet-dice">
            <span class="d10">{{computed::die1}}</span>
            <span class="d10">{{computed::die2}}</span>
        </div>
        <div class="sheet-key">Result:</div>
        <div class="sheet-value">{{computed::result}}</div>
    {{#comment}}
        <div class="sheet-comment">
            {{comment}}
        </div>
    {{/comment}}
</rolltemplate>Code language: HTML, XML (xml)
The addition to this template is the {{modifier}} property, which is now easily implemented.
The CRP Sheet Worker
The worker for this CRP is fairly involved, but quite short. Eventually, the rolls will look like:
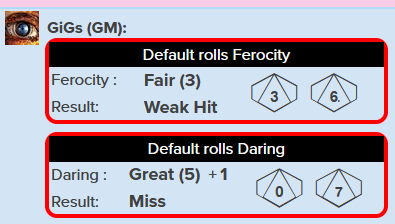
There are a few things to explain, but first the full worker.
const capitalize = words => words.split(" ").
      map(s => String(s[0]).toUpperCase() +
      String(s).slice(1).toLowerCase()).join(" ");

skills.forEach(button => {
  on(`clicked:${button}_button`, () => {
    const skill = capitalize(button);
    const skill_score = `${button}_score`;
    getAttrs(['character_name', skill_score, 'hurt', `scar_${button}`], v => {
      const score = +v[skill_score];
      const mods = (+v.hurt || 0) + (+v[`scar_${button}`] || 0);
      const roll_string = `&{template:ladder} {{header=1}} {{who=${capitalize(v.character_name)} }}  {{skill=${skill} }} {{modifier=[[?{Modifier|0|1|2|-1|-2} - ${mods}]] }} {{die1=[[1d10]] }} {{die2=[[1d10]] }} {{score=[[${score}]] }}  {{result=[[0]] }}`;
      startRoll(roll_string, ladder_roll => {
        const die1 = ladder_roll.results.die1.result;
        const die2 = ladder_roll.results.die2.result;
        const mod = +ladder_roll.results.modifier.result || 0;
        const target = Math.min(10, Math.max(1, score + mod));
        const count = (target >= die1) + (target >= die2)
              + (target > die1 && die1 == die2);
        const result = (count == 0 & die1 == die2) ? "Terrible Miss":
              count > 2 ? 'Amazing Hit' :
              count > 1 ? 'Decisive Hit' :
              count < 1 ? "Decisive Miss" : 'Conflicted';
        finishRoll(ladder_roll.rollId, {
          result: result,
          die1: 'abcdefghij'[die1-1],
          die2: 'abcdefghij'[die2-1],
          score: `${capitalize(ranks[score-1])} (${score})`
        });
      });
    })
  });
});Code language: JavaScript (javascript)
We start with a one-line function, capitalize.
const capitalize = words => words.split(" ").
      map(s => String(s[0]).toUpperCase() +
      String(s).slice(1).toLowerCase()).join(" ");Code language: JavaScript (javascript)
Okay, here it’s actually split across 3 lines but that;s to make it more legible. This is splitting a string of words into individual words by splitting on its spaces, then for each word, taking the first letter and capitalizing it, then joining those words back into a sentence. So this works for single world names, but also works for multi-word names.
When addressing a group of letters, you can treat it as a string and do thing[0] to get the first letter, and thing.slice(1) to get the rest of the letters. That is what is happening to each word.
Then we have the CRP sheet worker, the part that does the actual roll.
skills.forEach(button => {
  on(`clicked:${button}_button`, () => {
    const skill = capitalize(button);
    const skill_score = `${button}_score`;Code language: JavaScript (javascript)
It refers to button a few times – that is always the current skill. Remember, a forEach loop goes through each item in turn, so we always know which iteration of the skills array we are in.
getAttrs(['character_name', skill_score, 'hurt', `scar_${button}`], v => {Code language: JavaScript (javascript)The getAttrs line grabs each names attribute frim the character sheet. Here are a couple of attributes we haven’t seen before. hurt and scar_skill-name are created in the conditions section and are always either 0 or 1.
      const score = +v[skill_score];
      const mods = (+v.hurt || 0) + (+v[`scar_${button}`] || 0);Code language: JavaScript (javascript)
This is where we convert those values into usable properties.
const roll_string = `&{template:ladder} {{header=1}} {{who=${capitalize(v.character_name)} }} {{skill=${skill} }} {{modifier=[[?{Modifier|0|1|2|-1|-2} - ${mods}]] }} {{die1=[[1d10]] }} {{die2=[[1d10]] }} {{score=[[${score}]] }} {{result=[[0]] }}`;Code language: JavaScript (javascript)Here is where we create the roll code. It’s handy to store that into a variable, just for readability. Feel free to examine what makes up the roll. This is generated automatically when a button is clicked, so it must be launched from a character because it refers to the attribute character_name, hurt and skar_skill name, and skill-name_score, which are attributes on a character sheet.
It would be possible to rewrite the code to allow them to be manually supplied, but since there are so few rolls in this system, it isn’t worth it.
      startRoll(roll_string, ladder_roll => {
        const die1 = ladder_roll.results.die1.result;
        const die2 = ladder_roll.results.die2.result;
        const mod = +ladder_roll.results.modifier.result || 0;Code language: JavaScript (javascript)
Then we start the actual roll. In CRP, you can grab any named properties of a roll as long as they are in an inline roll, and numerical. We grab a few here for later use. Compare with the roll string to see what actually is being grabbed.
        const target = Math.min(10, Math.max(1, score + mod));
        const count = (target >= die1) + (target >= die2)
              + (target > die1 && die1 == die2);
        const result = (count == 0 & die1 == die2) ? "Terrible Miss":
              count > 2 ? 'Amazing Hit' :
              count > 1 ? 'Decisive Hit' :
              count < 1 ? "Decisive Miss" : 'Conflicted Hit';Code language: JavaScript (javascript)
Now we start taking advantage of the CRP – where you can perform calculations with all the power of JavaScript. target just takes score, and then applies any modifiers to it. count is an intermediate variable, it is to make the result calculation more readable. And in result, we have a bunch of if statements to build up a result statement.
        finishRoll(ladder_roll.rollId, {
          result: result,
          die1: 'abcdefghij'[die1-1],
          die2: 'abcdefghij'[die2-1],
          score: `${capitalize(ranks[score-1])} (${score})`
        });
      });
    })
  });
});Code language: JavaScript (javascript)
And then in finishRoll we save them to properties to be exposed in the rollTemplate. Each property here is saved to the named key, but in its computed:: property.
The die1 and die2 properties have the task of converting a number (1-10) to a letter (a-h) so that the dice are displayed properly. As noted in capitalize above, you can grab the nth ‘letter’ of a string by using the [nth] syntax. Since JavaScript starts at 0 not at 1 so we have to subtract 1.
        });
      });
    })
  });
});Code language: JavaScript (javascript)
And finally we just have to close all the parts we opened with brackets. There area lot of them, but you can’;’t afford to miss one!
And that’s it, the CRP sheet worker. But there’s one thing we want to add for convenience.
Action Buttons into Roll Buttons
The Abilities section starts with this complex but connected mess:
<button type="roll" name="roll_audacity" value="@{audacity_button_code}" >
    <span>Audacity</span>
</button>
<input type="hidden" name="attr_audacity_button_code" value="">
<button type="action" name="act_audacity_button" class="hidden"></button>Code language: HTML, XML (xml)
Let’s break that down. We have the name of the skill.
<span>Audacity</span>Code language: HTML, XML (xml)But we want to make that a button, so when clicked that skill will be rolled, taking its name and current value. Ideally, we’d like to type this:
<button type="action" name="act_audacity_button">
    <span>Audacity</span>
</button>Code language: HTML, XML (xml)
That is the same format as a roll button, with the name of the skill displayed in a span. But we want the user to be able to do things with that button, like drag it to the macrobar. But there’s a long-standing bug in Roll20: you can do that with a roll button, but cannot with an action button. They work differently.
Furthermore, action buttons must always have the name of the character prepended to them, like &{name|button} and we need to account for the fact that players will often change the name of their characters, or at least the character sheet, so we can’t easily embed action buttons like this in the character sheet.
But there is a work around. We use a visible roll button that triggers the action button, through the use of a hidden input.
Building The Action Buttons That Do The Roll
For this process, we’ll modify the code introduced by Scott C over here. It’We are using a simpler process, because there are no repeating sections and we are trying to make it a bit easier to follow.
You can see the HTML used in this post, and we need one JavaScript sheet worker which we’ll explain here.
on('sheet:opened change:character_name', function() {
  getAttrs(["character_name"], function(values){

    const buttons = skills.map(skill => `${skill}_button_trigger`);

    const output = buttons.reduce((accumulator,button_name)=>{
      accumulator[button_name] = `%{${values.character_name}|${button_name.replace('button_code', 'button')}}`;
      return accumulator;
    },{});

    setAttrs(output,{silent:true});
  });
});Code language: JavaScript (javascript)
First, we assume that before this, there is a variable that identified the skills in the sheet, like this:
const skills = [ "audacity", "daring", "ferocity", "flair", "shenanigans", "tinkering", ];Code language: JavaScript (javascript)The event line (first line) tells us that whenever the sheet is opened, or the character_name of the sheet is changed, this sheet worker runs. then we grab whatever the new character name is, and the fun starts.
We build a variable called buttons, that takes all the skills, and transforms them into structures like audacity_button_code. This is the name of an attribute which is in the HTML above. It will hold the full name of the action button.
Now we use the reduce function, a very versatile but complex function, that takes a set of several items, and loops through them, doing something with each of them. Here we are building a set of the action button names,indexed by attributes.
Finally we save them to the attributes on the sheet. Now whenever one of those roll buttons is clicked, it triggers the attribute, and that is a full action button name, so that action button is triggered.
Finishing Up
And there we have it. The hardest part of the sheet is done. If you see any typos or problems in this sheet feel free to comment.
