We are going to look at creating Rolls with Memory, and a streamlined and very fast way to do Opposed Rolls, but we need a dice mechanic to showcase. We are going to use pendragon’s dice system, so this post shows one way to create that system in Roll20.
To show how this is done, we’ll use an example of an existing system, Pendragon.
The Pendragon System
In Pendragon, characters have a rating on a d20 scale, and if the rating is above 20, it is shown as a 20 plus a bonus. For example, a skill might be 8, 17, 20+4, 20+10, and so on.
The Basics of Rolls
- Roll d20 to try to get under your skill.
- Rolls cannot exceed 20.
- If you roll under your skill, you succeed.
- If you roll exactly your skill, it is a critical success.
- If you roll above your skill, it is a failure.
- If you roll a 20, and it is above your skill, that’s a 20.
- The actual result (the rolled plus any bonus) is sometimes important.
Applying Modifiers
- Add or subtract any modifier to the skill.
- Treat any skill above 20, as a score of 20 with the excess as a modifier.
Opposed Rolls
- If both critical, it is a draw.
- If both succeed, the highest roll succeeds.
- If you succeed and your opponent fails, you win.
- If you succeed but your opponent succeeds with a higher result, that’s a partial success.
So, if you have a 19 skill and gain a +5 bonus, that becomes 20+4. If you roll 8, it is actually a roll of 12.
If your opponent has a skill of 18, and rolls a 7, their result is 7. You win with a result of 12. They get a partial success.
The Code for a Sheet Worker
At this point, we’ll generate the code for your roll, and report the final result.
With no method for resolving a partial success, your opponent makes their own roll and the GM narrates the outcome. Later on, we’ll do opposed rolls, but for now we’ll do the simple unopposed roll.
For each CRP, we need the sheet worker, but we also need a rolltemplate which needs its own HTML and CSS. First, here’s the sheet worker (with some comments following).
on('clicked:pendragon', () => {
    const roll_string = "&{template:KAP} {{title=Example Roll}} {{die=[[1d20]]}} {{score=[[?{score|10}]]}} {{modifier=[[?{modifier|0}]]}}"

    startRoll(roll_string, pendragon => {
        const die = pendragon.results.die.result;
        const score_base = pendragon.results.score.result;
        const score = (String(score_base).indexOf("+") !== -1) ? (score_base.split('+')[0] ) : +score_base;

        const modifier = pendragon.results.modifier.result ;

        const temp_total = score + modifier;
        const target = Math.min(20, temp_total);
        const bonus = Math.min(20, Math.max(0, temp_total -20));
        const roll = Math.max(0, Math.min(20, die + bonus));
        const result = roll === target ? 'Critical' :
                        roll === 20 ? 'Fumble' :
                        roll > target ? 'Failure' : `Success (${roll})`;
        console.log({score_base, score, modifier, target, bonus, roll, result});
        finishRoll(pendragon.rollId, {
            score: (score > 20 ? `20 +${score-20}` : score) + (modifier != 0 ? ` ${modifier >= 0 ? '+' : ''}${modifier}`: '') ,
            die: String.fromCharCode(96 + die),
            modifier: result
        });
    });
});Code language: JavaScript (javascript)
The roll presented here is a generic roll not linked to a character sheet. You are queried for a skill and a modifier. If you have a skill like 20+4, that’s okay, you can enter that.
The sheet worker for this is kind of complex, so I’ll go through it and break it down step by step.
on('clicked:pendragon', () => {
    const roll_string = "&{template:KAP} {{title=Example Roll}} {{die=[[1d20]]}} {{score=[[?{score|10}]]}} {{modifier=[[?{modifier|0}]]}}"

    startRoll(roll_string, pendragon => {Code language: JavaScript (javascript)
I like to define a roll in its own variable. The code looks cleaner and makes it easy to just copy it out and paste into chat while testing.
This roll queries the user for all needed values, so there’s no need for a getAttrs section. But if you were creating this in an actual sheet, you’d probably want to link this to many attributes on the sheet.
        const die = pendragon.results.die.result;
        const score_base = pendragon.results.score.result;
        const score = (String(skill_base).indexOf("+") !== -1) ?
             (score_base.split('+')[0] ) : +score_base;

        const modifier = pendragon.results.modifier.result;Code language: JavaScript (javascript)
In those code, we need to extract certain values from the roll: &{template:KAP} {{name=Example Roll}} {{die=[[1d20]]}} {{skill=[[?{skill|10}]]}} {{modifier=[[?{modifier|0}]]}}, specifically the Score, Modifier, and d20 roll (die).
In a startRoll function, you can always extract items if they are rolls, using TEMPLATE.results.KEY.result, which is what we have done here.
We also have to handle situations where a might be entered as 20+5 instead of 25. Here, we have to treat the entered value as a String, then split on the “+” symbol to get the actual score (20) and the bonus.
        const temp_total = score + modifier;
        const target = Math.min(20, temp_total);
        const bonus = Math.min(20, Math.max(0, temp_total -20));
        const roll = Math.max(0, Math.min(20, die + bonus));Code language: JavaScript (javascript)
Once we have those three properties, we need to find out what the actual result was (d20 + any modifier, against the score). We build a bunch of intermediate variables to make this easier, here. The Math.min and Math.max functions are very handy, since we often have to limit the range of the found values.
Roll is the actual roll made with all modifiers taken into account.
        const result = roll === target ? 'Critical' :
                        roll === 20 ? 'Fumble' :
                        roll > target ? 'Failure' : `Success (${roll})`;Code language: JavaScript (javascript)
Then we use nested ternary operators to get a label for the roll – was it a Critical, Success, Failure, or Fumble?
console.log({score_base, score, modifier, target, bonus, roll, result})Code language: JavaScript (javascript)The console.log statement here is just so we can check the found variables have correct values. Once testing is complete, this line will be discarded.
        finishRoll(pendragon.rollId, {
            score: (score > 20 ? `20 +${score-20}` : score) +
              (modifier != 0 ? ` ${modifier >= 0 ? '+' : ''}${modifier}`: '') ,
            die: String.fromCharCode(96 + die),
            modifier: result
        });
    });
});Code language: JavaScript (javascript)
We make extensive use of the computed properties. Score is used to, well, show the score and any modifier. If the score is higher than 20, say 24, it needs to be shown as 20+4.
It would be nice to display the die roll as an actual die. Roll20 has a font, dicefontd20, to show dice rolls, but in that font, number 1 is character a, number 2 is character b, and so on. So, we need a way to convert numbers to the correct letters – String.fromCharCode() does that for us.
Finally, we need to display the actual result. We have the result and need an inline roll to save it to. The modifier key has no computed property, so we save it there just because it’s convenient.
And there, we are done with the sheet worker.
The Roll Template
Every example of CRP needs a rolltemplate. Since the subtleties of HTML and CSS are not the primary focus of this article, we shall keep it as simple as possible and use a modified version of the rolltemplate used in other CRP articles.
We can’t use the default rolltemplate because we are using computed properties. The most complicated part of this is on the modifier line, where we check if the modifier is 0 or above, to make sure it has a + before it.
<rolltemplate class="sheet-rolltemplate-pendragon">
    <div class="heading">{{title}}</div>
    <div class="properties">
        <div class="title">Attempt</div>
        <div class="attempt">{{computed::score}}</div>
        <div class="die">{{computed::die}}</div>
    </div>
    <div class="results">
        <div class="title">Result</div>
        <div class="result">{{computed::modifier}}</div>
    </div>
</rolltemplate>Code language: HTML, XML (xml)
The CSS has a number of tricky features. First, remember that rolltemplates still use legacy code and need to put sheet- before each class name.
.sheet-rolltemplate-pendragon {
    background: white;
    border: 1pt solid black;
    line-height: 2em;
}
.sheet-rolltemplate-pendragon .sheet-heading {
    background: black;
    color: white;
    font-weight: bold;
}
.sheet-rolltemplate-pendragon .sheet-properties,
.sheet-rolltemplate-pendragon .sheet-results {
    display: grid;
    grid-template-columns: 35% 35% 29%;
    column-gap: 0.5%;
    border-bottom: 1pt solid black;
}
.sheet-rolltemplate-pendragon .sheet-properties .sheet-title,
.sheet-rolltemplate-pendragon .sheet-properties .sheet-result,
.sheet-rolltemplate-pendragon .sheet-properties .sheet-attempt,
.sheet-rolltemplate-pendragon .sheet-properties .sheet-die {
    margin: auto;
    width:auto;
}
.sheet-rolltemplate-pendragon .sheet-properties .sheet-title {
    text-align: right;
}
.sheet-rolltemplate-pendragon .sheet-properties .sheet-result,
.sheet-rolltemplate-pendragon .sheet-properties .sheet-attempt,
.sheet-rolltemplate-pendragon .sheet-heading,
.sheet-rolltemplate-pendragon .sheet-results {
    text-align: center;
}
.sheet-rolltemplate-pendragon .sheet-properties .sheet-die {
    text-align: left;
    font-family: dicefontd20;
    font-size: 36px;
    line-height: 40px;
}
.sheet-rolltemplate-pendragon .sheet-results .sheet-result {
    grid-column: 2 / 4;
}
.sheet-rolltemplate-pendragon .inlinerollresult,
.sheet-rolltemplate-pendragon .inlinerollresult.fullfail,
.sheet-rolltemplate-pendragon .inlinerollresult.fullcrit,
.sheet-rolltemplate-pendragon .inlinerollresult.importantroll  {
    background-color: transparent;
    border: none;
}Code language: CSS (css)
Most importantly, the .sheet-die declaration sets the die size. The chosen font is not very legible, so we make its size large enough to see. With a better font, we’d change those.
A Picture of Typical Rolls
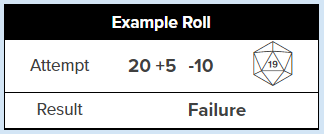
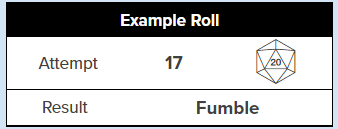
Putting it all together, this is the kind of output we get.


In an actual campaign, we’d make this look a lot prettier, and probably theme it to look medieval. We’d also look for a nicer font for the d20 die roll! But for a simple demonstration, it works perfectly.
Where To Go From Here
Now that we have a basic dice mechanic, we’ll look at how to turn this into a Roll With Memory, and how to resolve Opposed Rolls extremely smoothly.
