This post relies on CSS. Here’s a refresher.
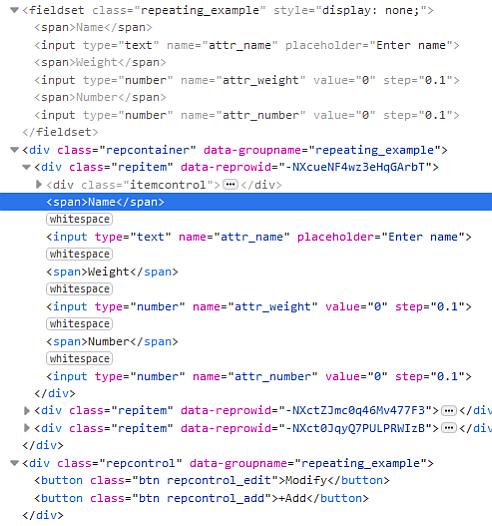
In the last post, we looked at the composition of a repeating section and learned that each row was a .repitem, contained within a .repcontainer with a data-groupname. We’ll now learn how to present the repeating section the way we want to. As a refresher, here’s what a basic repeating section might look like in the browser’s inspector.
Basic Inheritance (repcontainer and repitem)
You can control the appearance of all repeating sections using repcontainer and repitem. Let’s say you weant all text in all repeating sections to be red:
.repitem {
   color:red;
}Code language: CSS (css)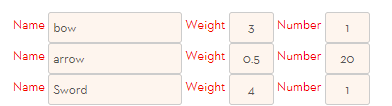
Notice that the text inside the inputboxes is not red. We’d have to get more specific for that.
.repcontainer affects the entire repeating section, and repitem affects individual rows. Observe the the difference between these two bits of code:
.repitem {
   border: 1pt solid red;
}Code language: CSS (css)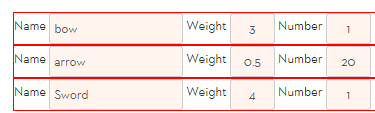
.repcontainer {
   border: 1pt solid red;
}Code language: CSS (css)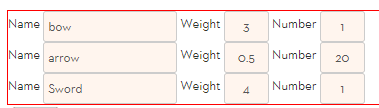
So pick the correct one for your needs, knowing what you’ll be affecting.
(Note: if using legacy mode, don’t prepend this with sheet-. If you don’t understand that sentence, it’s fine – when making sheets today, you shoould never be using legacy mode. It’s outdated.).
data-groupname
repcontainer and repitem are indiscriminate and affect all repeating sections. When you want to target specific sections, you need data-groupname.
You can use [data-groupname] in a similar fashion to .repcontainer, to affect all repeating sections. But it also affects the buttons at the bottom of each section, which might not be desired.
[data-groupname] {
    border: 1pt solid red;
}Code language: CSS (css)
Where this shines though is the ability to target specific elements of specific repeating sections.
[data-groupname="repeating_example"] .repitem {
    border: 1pt solid red;
}Code language: CSS (css)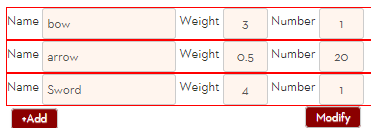
Here just the repitems (rows) inside the repeating_example repeating section are affected. The buttons under the repeating section are not affected.
I’ve used a fairly impractical style here, so you can see it. But you can do all sorts of things. Where it gets really clever is when you change the layout of the repeating section itself.
Arranging Rows Horizontally
In HTML and CSS there is usually more than one way to do what you want. There are at least three ways to change the layout of a repeating section in this way. All use the display property.
The example on the CSS Wizardry guide of the Roll20 wiki uses display:inline-block, something like this.
[data-groupname="repeating_example"] .repitem {
    display:inline-block;
    color:red;
}Code language: CSS (css)
inline-block means that the element affected will be drawn on the same row. This affects the entire .repitem, so you get as many repitems as will fit in a single line then it goes to the next line.

The CSS Wizardry page suggests slightly different code than shown here. It uses the > character – that means .repitems that are direct children of the .repcontainer are affected. But Roll20 doesnt allow nested fieldsets, so the only repitems under repcontainer will always be directlly below it. Thus, we don’t need the > character right now.
That said, Roll20 may one day allow nested fieldsets. Assuming they are built the same way, > might very well be needed. So there’s no harm in including it now to future proof your code.
You can also use display:grid to change the layout. Remember that with grid, it assumes you are working on child elements so we don’t need to specific .repitem – they are always child items of .repcontainer.
[data-groupname="repeating_example"] {
    display:grid;
    grid-template-columns: repeat(3, 1fr);
    column-gap: 5px;
    color:red;
}
[data-groupname="repeating_example"] .repitem {
    border: 1pt solid red;
    margin-bottom: 5px;
}Code language: Brainfuck (brainfuck)
The code above produces the image below. I’ll draw attention to a few things.

Since this is a grid, which always works on child items, we don;t need to explicitly list the repitem in the first declaration block. By choosing a repeat(3), it places exactly 3 repitems in that space, and anything inspide thoose items might go onto a second line. If there were four rows, the 4th row would cross over into a new line since this grid assumes 3 columns.
The second declaration block does expreslly state the repitem because we are giving it a border. The margin is just increase there are 4th or more rows, to make sure any extra rows dont come too close. (Try it.)
The third method is using display:flex, which is a lot like grid. I’ll leave that as an exercise for the reader.
Styling the Add/Modify/Edit Buttons
The next post will cover changing the appearenace of the add/modify buttons – a very common desire.
