In this post, I’ll briefly cover the most important things you need to know to build a repeating section.
HTML: Building a Repeating Section
Create a fieldset container, with a class repeating_something and put in it all the HTML elements you want in a single row. You might use a div as a container within the section. Here’s a simple encumbrance fieldset.
<div class="gear">
  <h4>Item</h4>
  <h4>Weight</h4>
  <h4>Number</h4>
  <h4>Container</h4>
</div>
<fieldset class="repeating_gear">
  <div class="gear">
    <input type="text" name="attr_item" class="item">
    <input type="number" name="attr_weight" class="weight" value="0" step="0.01">
    <input type="number" name="attr_quantity" class="quantity" value="0">
    <select name="attr_container" class="noarrows">
      <option selected>Carried</option>
      <option>Backpack</option>
      <option>Mount</option>
      <option>Treasury</option>
    <select>
  </div>
</fieldset>Code language: HTML, XML (xml)
There are 4 elements here. A text input to hold the name of the item carried; a number input to hold the item’s weight; another number input to show how many are owned; and finally a select dopdown to allow the user to pick where the item is located.
CSS: Styling a Repeating Section
Every element in the container can have CSS styling applied.
/* first set the grid layout, so we have uniform columns */
div.gear {
display: grid;
grid-template-columns: 120px repeat(2, 50px) 80px;
column-gap: 5px;
}
/* now apply whatever styping you want to the various inputs and select */
.ui-dialog .charsheet div.gear input,
.ui-dialog .charsheet div.gear select {
height:28px;
margin-bottom: 2px;
border-radius: 5px;
border: 1pt solid gray;
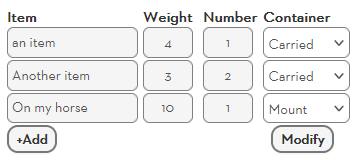
}Code language: CSS (css)With this fairly basic styling applied, the repeating section looks like the picture.
The CSS first sets the columns, then some CSS is applied to the input and select to make them uniform. The complex declaration is needed for the inputs – number inputs are very hard to style. See the post on Specificity.
Special Repeating Section Styling
It can be hard to Style a Repeating Section, but a look at the picture above shows we have changed the appearance of those buttons a little. We used the code in this declaration block, targeting the repcontrol and the data-groupname of repeating_gear.
You won’t want to alter those buttons on every sheet, but it can be done.
.repcontrol[data-groupname="repeating_gear"] button.btn {
    background-color: whitesmoke;
    background-image: none;
    border: 2px solid #777;
    font-weight: bold;
    border-radius: 10px;
    padding: 2px 7px 2px;
}
Code language: CSS (css)
JavaScript: Automating a Repeating Section (Coding)
Now we want to add up the weight in this repeating section, but also assign it to the different containers. First, we create the inputsthat will contain the final values. They are set to readonly because players can’t adjust them – the sheet worker does.
<h3>Weights</h3>
<span>Carried and Accessible:</span>
<input type="number" name="attr_carried" value="0" readonly>
<span>In Backpack:</span>
<input type="number" name="attr_backpack" value="0" readonly>
<span>On Mount:</span>
<strong><input type="number" name="attr_mount" value="0" readonly></strong>
<span>Treasury:</span>
<input type="number" name="attr_treasury" value="0" readonly>
Code language: HTML, XML (xml)
Then we create a sheet worker to go through every row and add the weights, then put it in the correct container. (The sheet worker below contains comments to describe what’s going on.)
/* a global function to construction repeating section names */
const section_name = (section, id,field) => `repeating_${section}_${id}_${field}`;

/* watch for changes */
on('change:repeating_gear:weight change:repeating_gear:quantity change:repeating_gear:container', () => {
  /* get the row ids first and build an array of all section names */
  getSectionIDs('repeating_gear', ids => {
    const fields = [];
    ids.forEach(id => {
       field.push(section_name('gear', id,'weight'),
         section_name('gear', id, 'quantity'),section_name('gear', id, 'container'));
    });
    /* use that array to get the actual stat values */
    getAttrs(fields, values => {
       /* initialise an output value for weights in each container */
       let weights = {carried: 0, backpack: 0, mount: 0, treasury: 0};
       /* loop through the ids array again, and get the attributes */
       ids.forEach(id => {
         const weight = +v[section_name('gear', id,'weight')] || 0;
         const quantity = +v[section_name('gear', id,'quantity')] || 0;
         const container = v[section_name('gear', id,'quantity')];
         /* check if a valid container is selected */
         if(Object.keys(weights).includes(container) {
           weights[container] += (weight * quantity);
         }
       });
       /* now save the attribute values */
       setAttrs(weights);
    });
  });
});Code language: JavaScript (javascript)
The sheet worker could be made easier to write through more advanced coding techniques, but this shows the construction of the sheet worker. Notice that we loop through the section twice. First, to build an array of attribute names for getAttrs, and again do the actual addition. This is necessary to avoid putting getAttrs inside a loop, which is always a bad idea.
Conclusion
There’s a lot more we could cover, but the series has already done that. This is a good example of all the stuff you need regularly. That concludes the repeating section guide. In the next post, I’ll show a collection of useful functions for repeating sections. After that, it’s time to look at RollTemplates!
