- Campaign Settings for the Carrington Sheet
- The Sidebar Back of the Carrington Sheet
- The Sidebar Front of the Carrington Sheet
- Rolls and the Rolltemplate in the Carrington Sheet
- Wounds in the Carrington Sheet
- Eldritch Powers in the Carrington Sheet
- A variety of systems in the Carrington Sheet
- Buying an Ability in the Carrington Sheet
- How Many Abilities in the Carrington Sheet
- Managing Experience in the Carrington Sheet
- Adding a Description to the Carrington Sheet
- The Bio Tab in the Carrington Sheet
There’s some overlap with this post and the next sheet post about the Sidebar.
To create the rolls on this sheet, we are using Custom Roll Parsing. This is complicated, because when CRP, you have to make a custom sheet worker *and* a rolltemplate to display the results. That needs HTML, CSS, and JavaScript – and all three of those use versions customised for Roll20.
The normal process would be to show the completed product and explain how it’s done, but I think it will be illustrative to show the process of creation. So, I’ll show how I did it.
Table of Contents
Overall Philosophy
When building a complex Custom Roll Parsing solution, you need the sheet worker, and a custom roll template (which needs HTML and CSS). But trying to create these at the same time can make it harder to figure out what is happening when something inevitably goes wrong.
The best approach, IMHO, is to exploit the default rolltemplate. This exists in every character sheet and needs no design work. So, you can concentrate on building the sheet worker. When you know that is doing what you need, you can then build your custom rolltemplate, and then if needed go back and tweak the sheet worker to fit it.
The Original Sheet Worker, With The Default Roll Template
We want players to be able to click an Ability Name, and get a roll immediately. The buttons are named act_charm-button, act_ferocity-button, etc. The buttons match the ability names.
We also want the sidebar to include the names of the ranks (Terrible, Poor, etc), but also have rolls linked to them, so if you don’t know what Ability you are rolling, but it is a Fair rank, you can just click the Fair button.
[...ranks, ...abilities, 'Eldritch'].forEach(btn => {
   on(`clicked:${btn.toLowerCase()}-button`, event=>{Code language: JavaScript (javascript)
The ranks and abilities arrays have already been created, each containing a suitably named list, so we can use forEach to loop through them. Eldritch is added because that is a special “skill” we have added later. In this loop, btn will always be replaced with Terrible, Good, Ferocity, Worldly, or whatever.
      getAttrs([btn, 'die_system', 'modifier_query', 'whisper'], v => {
         const dice = int(v.die_system) ? '1d6-1d6' : '4dF';
         const modifier = int(v.modifier_query) ?
     `?{Difficulty|Poor,1|Fair,0|Good,-1|Great,-2|Superb,-3|Spectacular,-4}`: 0;
         const whisper = int(v.whisper) ? `/w GM `: '';Code language: JavaScript (javascript)
Whenever you want to collect stat values from a character sheet, you need getAttrs. Remember, btn will be the name of the thing we are looking for. The rest are properties that apply to any roll. Let’s look at them.
All these properties show choices between two options. This worker supports two die systems, 4dF or 1d6-1d6; modifier_query is whether the roller should be prompted to pick a modifier or prompted, and whisper is whether the roll is whispered only to the GM (and not shown to all players) or just send to group chat.
Now back to btn. This can be two different types of ranks, a rank like Poor or Fair, or an ability name whose value is a rank. We can find out which it is like this:
         const rank = ranks.includes(btn) ? btn : v[btn];
         const title = btn;
         let subtitle = btn === rank ? '' : rank;
         const index = ranks.indexOf(rank) || 0; // note Fair has an index of 2.Code language: JavaScript (javascript)
We want to find the rank of the think being triggered. We already have an array of rank values, so if the rank is in there we don’t have to do anything, but if it not, it is something like Ferocity, Worldly, etc- an Ability Name. But each Ability Name also contains the rank so we can get that with v[btn].
Now we want title to show what is being rolled, and only if it is an ability, show its rank in brackets after (the brackets will be added later, in the roll template). That gives us the subtitle.
Finally, we know the rank, and we need to gte a number from it (fair = 2, Good = 3, Great = 4, etc). We can grab that directly from the ranks array.
Now we have all the parts we need, and can build the actual roll output.
Making a Roll
Now we have to build a suitable roll, and output that to startRoll, then finish the roll, and see what it looks like in chat. The console.info statement is there so we can confirm everything is being calculated properly.
         const roll_code = `${whisper}&{template:default} {{title=${title} }} ${subtitle ? `{{subtitle=${subtitle} }}` : ''} ${modifier ? `{{modifier=[[${modifier} ]] }}`: ''} {{total=[[ ${dice} + [[${index}-2]] + ${modifier}  ]]}};
         console.info({title, roll_code, rank, index, dice, modifier, whisper});
         startRoll(roll_code, new_roll => {
            finishRoll(new_roll.rollID)
         });
      });
   });Code language: JavaScript (javascript)
You might want to thoroughly examine that roll_code variable.
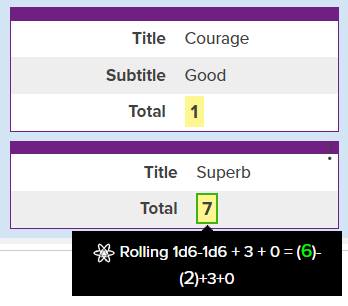
Testing the roll gives us the image displayed. We can see that Title and Subtitle are being displayed properly, and we can hover over the roll to see what is being added.
Everything checks out. But remember this is a temporary measure. Now we can build our own custom template and make sure everything is laid out properly.
We’ll probably want to add some extra details as part of that process.
The Custom Roll Template
This is where you really get to show off your artistry. Unfortunately, I don’t want to do that – I just want to show the results! My roll will eventually look like this:
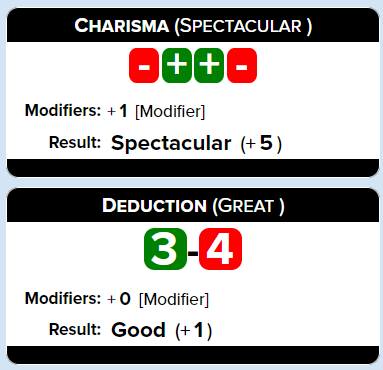
(Notice both types of roll are displayed here – the 4dF roll, and the 1d6-1d6 method.)
When creating a rolltemplate, it’s just like creating a character sheet – you need to use HTML to create the basic structure, and use CSS to style it. To complicate things, rolltemplates don’t support modern code. You need to use legacy code, which means prepending sheet- at the start of all classes in the rolltemplate CSS, and putting all class declarations inside .sheet-rolltemplate-[name]. If my code looks odd, that’s probably why.
By the way, I’ve called my rolltemplate, ladder, so that would be .sheet-rolltemplate-ladder.
The HTML Code
I’ll split the HTML into blocks and explain each block.
{{{{noop}}}}
<rolltemplate class="sheet-rolltemplate-ladder">
   <div class="sheet-container">
      {{#title}}
      <div class="sheet-header">
         <span class="sheet-title">{{title}}</span>
         {{#subtitle}}
            <span class="sheet-subtitle"> ({{subtitle}})</span>
         {{/subtitle}}
      </div>
      {{/title}}Code language: Handlebars (handlebars)
We start with a {{{{noop}}}} block. That is only need for Handlebars, because that does not work with the {{ }} brackets you have to use in rolltemplates, and which I’ve used a lot. If you aren’t using Handlebars, you can skip that.
Rolltemplates must always start with the class="sheet-rolltemplate-NAME" – without it, it won’t be recognised.
I then create a container div – everything goes inside that. This div isn’t actually needed, but it’s nice for organisation.
Then a header block is created for easy styling a title section. This is wrapped in a {{#title}} test – if you recall, anything inside that kind of block only appears if the key actually exists. If a roll is created without a title, this whole section will be skipped.
The subtitle is created in a similar way – not every roll will have a subtitle.
      <div class="sheet-content">
         <div class="sheet-dice">
         {{^die2}}
            <span class="sheet-plus">{{computed::die0}}</span>
            <span class="sheet-link">-</span>
            <span class="sheet-minus">{{computed::die1}}</span>
         {{/die2}}Code language: Handlebars (handlebars)
Then a content block is created to hold everything that isn’t the header – the actual content of the rolltemplate.
I want to show the dice being rolled. I’ll create them in CSS, but for now I need to create the HTML for them. Scroll up to the picture to see what the final result will look like.
I know there are two separate roll types, and they are displayed differently – one uses two six-sided dice, and the other four special fudge dice. I decide each will have a die value stored in keys die0 to die3, and when rolling d6-d6, only two dice (die0 and die1) will exist. So we can create a block for when die2 does not exist – that’s what {{^die2}} does.
When using CRP, each numeric {{key}} can have two values. You create the second in the sheet worker, and access it with computed::. So the numbers shown on the dice are stored in the computed values of die0 and die1.
This next, lengthy block will display the dice for the four fudge dice.
         {{#die2}}
            {{#rollTotal() computed::die0 1}}
               <span class="sheet-die3">+</span>
            {{/rollTotal() computed::die0 1}}
            {{#rollTotal() computed::die0 0}}
               <span class="sheet-die2"> </span>
            {{/rollTotal() computed::die0 0}}
            {{#rollTotal() computed::die0 -1}}
               <span class="sheet-die1">-</span>
            {{/rollTotal() computed::die0 -1}}

            {{#rollTotal() computed::die1 1}}
               <span class="sheet-die3">+</span>
            {{/rollTotal() computed::die1 1}}
            {{#rollTotal() computed::die1 0}}
               <span class="sheet-die2"> </span>
            {{/rollTotal() computed::die1 0}}
            {{#rollTotal() computed::die1 -1}}
               <span class="sheet-die1">-</span>
            {{/rollTotal() computed::die1 -1}}

            {{#rollTotal() computed::die2 1}}
               <span class="sheet-die3">+</span>
            {{/rollTotal() computed::die2 1}}
            {{#rollTotal() computed::die0 0}}
               <span class="sheet-die2"> </span>
            {{/rollTotal() computed::die2 0}}
            {{#rollTotal() computed::die2 -1}}
               <span class="sheet-die1">-</span>
            {{/rollTotal() computed::die2 -1}}

            {{#rollTotal() computed::die3 1}}
               <span class="sheet-die3">+</span>
            {{/rollTotal() computed::die3 1}}
            {{#rollTotal() computed::die3 0}}
               <span class="sheet-die2"> </span>
            {{/rollTotal() computed::die3 0}}
            {{#rollTotal() computed::die3 -1}}
               <span class="sheet-die1">-</span>
            {{/rollTotal() computed::die3 -1}}
         {{/die2}}
         </div>Code language: Handlebars (handlebars)
Each block here is for one die. The die does not display a number, but a value of +, empty, and -. The die has a value of 1, 0, or -1. This code is checking if a die equals 1, 0, and -1, and converting into an appropriate symbol.
         {{#mods}}
         <div class="sheet-key">Effects:</div>
         <div class="sheet-value">
            {{#power}}
               {{#rollGreater() power -1}}+{{/rollGreater() power -1}}
               {{power}}[Power]
            {{/power}}
            {{#aspect}}
               {{#rollGreater() aspect -1}}+{{/rollGreater() aspect -1}}
               {{aspect}}[Aspect]
            {{/aspect}}
            {{#modifier}}
               {{#rollGreater() modifier -1}}+{{/rollGreater() modifier -1}}
               {{modifier}}[Modifier]
            {{/modifier}}
            </div>
         {{/mods}}Code language: Handlebars (handlebars)
The block above displays the modifiers. Any given roll might have a difficulty modifier, a modifier from an aspect, or a special power. This code detects if that modifier exists, and displays it if so.
The {{#mods}} key is a special test, created if any of the modifiers exist. If none of them do, this key won’t exist, so this block won’t be displayed.
         {{#total}}
            <div class="sheet-key">Result: </div>
            <div class="sheet-value sheet-total">
               {{#rollLess() computed::enemy_wins 1}}
                  Lose vs.
               {{/rollLess() computed::enemy_wins 1}}
               {{computed::total}} (
               {{#rollGreater() total -1}}+{{/rollGreater() total -1}}
               {{total}})
            </div>
         {{/total}}
      </div>Code language: Handlebars (handlebars)
Now, we get to display the actual result. Recall that if the player loses their roll, their opponent will get a Good, Great, or whatever success against them. That’s what Lose vs. is for.
Total has two values – {{total}} is the numeric total, and {{computed::total}} is the actual rank adjective. This block uses them both.
   </div>
</rolltemplate>
{{{{/noop}}}}Code language: Handlebars (handlebars)
And finally, we just need to ensure the rolltemplate is properly finished and all blocks are closed.
Styling The Rolltemplate
We have built the basic contents of the rolltemplate, but even a simple block like this needs a ridiculous amount of styling. Most of it is fairly self-explanatory. I’ll post the massive CSS block here and describe some sections I think are worth calling out.
.sheet-rolltemplate-ladder {
    margin-left: -37px;
}
.withoutavatars .sheet-rolltemplate-ladder {
    margin-left: -7px;
}
.sheet-rolltemplate-ladder .sheet-container {
    border: 1px solid;
    border-radius: 10px;
    padding-top: 5px;
    padding-bottom: 15px;
    background-color: black;
    color: white;
}
.sheet-rolltemplate-ladder .sheet-container .sheet-header {
    text-align: center;
    font-variant: small-caps;
    font-size: 1.2em;
    padding-bottom: 5px;
}
.sheet-rolltemplate-ladder .sheet-container .sheet-header .sheet-title {
    font-weight: bold;
}
.sheet-rolltemplate-ladder .sheet-content {
    display: grid;
    grid-template-columns: 80px 1fr;
    color: black;
    background: #FFF;
    line-height: 1.8em;
}
.sheet-rolltemplate-ladder .sheet-content .sheet-key {
    font-weight: bold;
    padding-right: 5px;
    text-align: right;
}
.sheet-rolltemplate-ladder .sheet-content .sheet-total {
    font-size: 1.2em;
}
.sheet-rolltemplate-ladder .sheet-content .inlinerollresult {
    background-color: transparent;
    border: none;
}

.sheet-rolltemplate-ladder .sheet-content .sheet-dice {
    grid-column: span 2;
    padding: 5px;
    font-weight: bold;
    border: none;
    font-size: 250%;
    margin-bottom: 5px;

    display: flex;
    align-items: center;
    justify-content: center;
}
.sheet-rolltemplate-ladder .sheet-content .sheet-plus,
.sheet-rolltemplate-ladder .sheet-content .sheet-minus {
    border-radius: 25%;
    width: 32px;
    padding-top: 4px;
    padding-bottom: 4px;
    padding-left: 2px;
}
.sheet-rolltemplate-ladder .sheet-content .sheet-plus {
    color: white;
    background-color: green;
}
.sheet-rolltemplate-ladder .sheet-content .sheet-minus {
    background-color: red;
    color: white;
}
.sheet-rolltemplate-ladder .sheet-content .sheet-dice .sheet-die1,
.sheet-rolltemplate-ladder .sheet-content .sheet-dice .sheet-die2,
.sheet-rolltemplate-ladder .sheet-content .sheet-dice .sheet-die3 {
    border-radius: 25%;
    border: none;
    text-align: center;
    margin-left: 1px;
    margin-right: 1px;
    width: 24px;
    height: 28px;
}

.sheet-rolltemplate-ladder .sheet-content .sheet-dice .sheet-die1 {
    background-color: red;
    color: white;
}

.sheet-rolltemplate-ladder .sheet-content .sheet-dice .sheet-die2 {
    background-color: black;
    color: white;
}

.sheet-rolltemplate-ladder .sheet-content .sheet-dice .sheet-die3 {
    background-color: green;
    color: white;
}Code language: CSS (css)
The CSS starts by reducing the left margins – the standard space allotted to rolltemplates is restricted, this widens it a bit. This is demonstrated in Jakob’s Better Rolltemplate.
.sheet-rolltemplate-ladder .sheet-content .inlinerollresult {
    background-color: transparent;
    border: none;
}Code language: CSS (css)
This section removes the standard yellow background that any rolls are normally give. This would be distracting in this rolltemplate, so we remove it.
Revised Sheet Worker
Now we have a custom rolltemplate, we can go back to the sheet worker and revise it to fit. In practice, you might be doing this and the rolltemplate at the same time.
The code for this worker starts out almost exactly the same (look at the getAttrs line). There are a bunch of comments detailing the reason for changes – you can delete those.
{{{{noop}}}}
[...ranks, ...abilities, 'Eldritch'].forEach(btn => {
   on(`clicked:${btn.toLowerCase()}-button`, event=>{
      getAttrs([btn, 'die_system', 'modifier_query', 'whisper', 'power'], v => {
         const rank = ranks.includes(btn) ? btn : v[btn];
         const title = btn;
         const subtitle = btn === rank ? '' : rank;

         const index = ranks.indexOf(rank) || 0; // note Fair is index of 2.
         const die_system = int(v.die_system);
         const dice = die_system ?  '1d6-1d6' : '4dF'; // 0 = 4dF, 1 = 1d6-1d6.

         const modifier = int(v.modifier_query) ?
    `?{Difficulty|Poor,1|Fair,0|Good,-1|Great,-2|Superb,-3|Spectacular,-4}`: 0;
         const whisper = int(v.whisper) ? `/w GM `: '';

// this is where the changes begin. Power can be a modifier set in the sidebar
// aspect is for compatibility with a planned later change.
         const power = int(v.power);
         const aspect = 0;

// we need to check if any modifier has been set, since there are different ones.
         const any_modifier =
               (modifier === 0 && power == 0 && aspect === 0) ? 0 : 1;

// Here we introduce some empty keys to later hold the dice values.
         const dice_string = `{{die0=[[0]]}} {{die1=[[0]]}} ${die_system ?
               '' : `{{die2=[[0]]}} {{die3=[[0]]}}`}`;

/* this will be sent to chat as the roll. Notice how some keys like
   subtitle, modifier, and power are variable and might not be included
   enemy_wins is a special variable that is checked in the rolltemplate. */
         const roll_code = `&{template:ladder} {{title=${title} }} ${subtitle ?
               `{{subtitle=${subtitle} }}` : ''} ${modifier ?
               `{{modifier=[[${modifier} ]] }}`: ''} ${power ?
               `{{power=[[${power} ]] }}`: 0} ${any_modifier ?
               `{{mods=}}` : ''} ${dice_string} {{enemy_wins=[[0]]}} {{total=[[ ${dice} + [[${index}-2]][Rank] + ${modifier}[Modifier] + ${power}[Power]  ]]}} `;

/* startRoll is the big section we couldn't do earlier.
   There's a lot of calculation here in preparation for finishRoll
   in finishRoll, we set up the computed:: values for those keys that use them */
         startRoll(roll_code, new_roll => {
            const new_dice = new_roll.results.total.dice
            const new_result = new_roll.results.total.result;

            const sum_of_dice  = die_system ? new_dice[0] - new_dice[1] :
                  new_dice.reduce((total, current) => total + current, 0);
            const max_roll = sum_of_dice >= (4 + die_system) ? 1 : 0;
            const min_roll = sum_of_dice <= -(4 + die_system) ? 1 : 0;
// setting a max and min_roll is hand to make the total_index calculation easier

            const total_index = (max_roll && new_result >= 7) ? 7 :
                  (min_roll && new_result <= -3) ? 0 :
                  Math.min(6, Math.abs(new_result)+2);
// This checks if a roll is Terrible or Legendary and if not, the actual index.
            const total_rank = ranks[total_index];
            const enemy_wins = (total_rank === "Terrible") ? 0 :
                  (new_result > -1 ? 0 : 1);
// enemy_wins shows if a play has rolled worse than Fair.

            finishRoll(new_roll.rollId, {
               total: total_rank,
               enemy_wins: 1-enemy_wins,
               die0: new_dice[0],
               die1: new_dice[1],
               die2: new_dice[2],
               die3: new_dice[3]
            });
         });
      });
   });
});
{{{{/noop}}}}Code language: JavaScript (javascript)
And there we have it – the sheet can now handle any rolls that will be made in this game system.
There are still some tweaks to be made, but they can be done later – this post took a lot of work!
