- Campaign Settings for the Carrington Sheet
- The Sidebar Back of the Carrington Sheet
- The Sidebar Front of the Carrington Sheet
- Rolls and the Rolltemplate in the Carrington Sheet
- Wounds in the Carrington Sheet
- Eldritch Powers in the Carrington Sheet
- A variety of systems in the Carrington Sheet
- Buying an Ability in the Carrington Sheet
- How Many Abilities in the Carrington Sheet
- Managing Experience in the Carrington Sheet
- Adding a Description to the Carrington Sheet
- The Bio Tab in the Carrington Sheet
This is probably the single most complex part of the sheet, and includes some interesting techniques.
We’ll create a floating section that is only visible when a button is clicked, which contains all the experience details. This uses Handlebars, HTML, CSS, and a lot of Sheet Workers.
We’ll also add a repeating section to the bottom of the Abilities list, for players who want to acquire extra Abilities not in the standard list, or who use a non-standard set of ability names. We’ll also include a calculation which calculates how many of each Ability Rank a character has, and how many they should have at their experience. This makes it easy to check characters have the experience they should have, as well as making it easy for players to manage their own advancement.
The Floater
The experience section isn’t available all the time. Players only gain and spend XP at the end of a session, so we want to make this a floating box that hovers above the character sheet when in use, and is hidden the rest of the time.
We create a new div to contain everything, but place it inside the Abilities div. We plan to use position:absolute on it because the Bio section above can change height, and we want this to maintain a consistent position next to the Abilities.
The code for this basic framework is very simple. We just need to create a div with a class, xp-floater, and the styling which includes position: relative and a left: property to describe how far the floater is pushed so that it doesn’t hide the Abilities list.
We also need to use a CSS rule to hide or show the floater on command. We we’ll use the already existing tabs rule, and change the Ability title to a button that toggles the show_xp attribute and changes the visibility of the xp-floater.
<input type="hidden" name="attr_show_xp" class="show-xp">
<div class="abilities grid-box">
   <div class="xp-floater">
      <!-- the code for this
           will go here -->
   </div>
   <button type="action" name="act_show_xp" class="show-xp title">
      <h3>Abilities</h3>
   </button>Code language: HTML, XML (xml)
And updating to the tabs code in sheet workers, we just add the show_xp attribute for another toggle.
const tabs = {
        toggles: ['biotoggle', 'lock', 'show_xp'],
        inserts: {

        }
};Code language: JavaScript (javascript)div.xp-floater {
display: none;
background-color: lightgreen;
border: 2pt solid green;
border-radius: 15px;
width: 550px;
}
input.show-xp[value="1"] ~ div.abilities div.xp-floater {
display: block;
position: absolute;
left: 250px;
}Code language: CSS (css)Here we give the floater some styling, then set the appearance it takes when the floater ability is clicked.
We are moving the input.show-xp button right at the top of the sheet. If we placed it directly in front of the xp-floater, it would look like:
input.show-xp[value="1"] ~ div.xp-floater {Code language: CSS (css)Advances
The Advance is the basic unit of, well, advancement. When characters gain an advance, certain things happen, and when a threshold number of advances is gained, something even better happens. We want to show a progress track at the top of the xp-floater, so players can see where they are.

You can see at a glance how many advances you need to move through each Advancement Rank. We’ll use CSS to block pointer-events – players can’t manually adjust these boxes, that’s done later through a sheet worker for experience.
Since there are 7 blocks, we’ll create these with a CSS Grid once again, then manually create the number of boxes.
div.xp-floater div.experience {
    display:grid;
    grid-template-columns: 40px repeat(2, 50px) 70px 90px 100px 90px;
    column-gap: 10px;
    margin-left: 5px;
    margin-right: 5px;
    margin-bottom: 10px;
    text-align: center;
}
span.rank {
    display: block;
    font-weight: bold;
}Code language: CSS (css)
In this code, we have created a block with margins, so that it appears nicely in the floater.
The span.rank is set to display:block; to make sure that a new line is created after each entry. Normally psnas are inline, which means there is no new line.
{{#each ladder}}{{#unless @first}}{{#unless @last}}
   <div>
      <span class="rank">{{this}}</span>
      {{#repeat @key}}
      <input type="checkbox" name="attr_ap_{{downcase this}}_{{@index}}" class="noclick" value="1" />
      {{/repeat}}
   </div>
   {{/unless}}{{/unless}}{{/each}}
   <div>
      <span class="rank">Extras</span>
      {{#repeat count=5 start=0}}
      <input type="checkbox" name="attr_extra{{@index}}" class="noclick extra{{@index}}" value="1" />
      {{/repeat}}
   </div>
</div>
<h3>Managing Experience</h3>Code language: Handlebars (handlebars)
If you look at the HTML, so can see extensive use of Handlebars code. We are going through the ladder (Terrible, Poor, Fair, etc), and ignoring the first and last items. In each group, we create a number of checkboxes equal to the rank of that item (Poor = 1, Fair =2, Good = 3, etc). This matches the @key of the item in that array, so we can extract it programmatically.
This is a long section of HTML, but with Handlebars we create it very rapidly (8 lines of code vs 44, in the Ranks section).
Note that I needed each checkbox to be uniquely identified, because its going to be set to 0 or 1 in later code. That’s why the checkbox names look like that.
Managing Experience
The part below the advance track is divided into three columns, something like this.
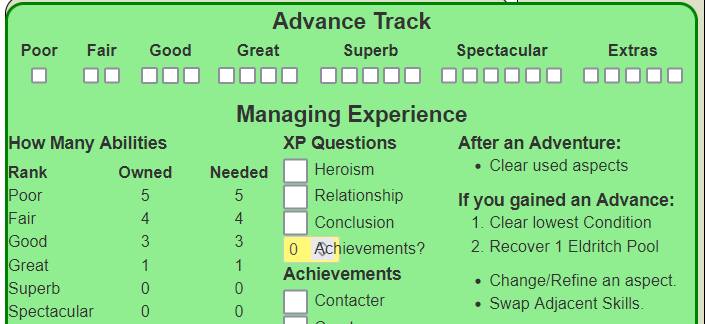
This will be made to look prettier later, but you can see there are three columns (they could at least do with borders). Here, we’ll describe what they are each for and how they are built. The first column is mots complex and has several parts to it, so we’ll come back to that. The other columns are very straightforward.
The Final Column: Reminder Text
This consists of some text. We could get fancy and built it in handlebars, but we already have it in raw HTML, so let’s use that.
<div class="reminders">
   <h4 class="bold">After an Adventure:</h4>
   <ul>
      <li title="also clear any other per Chapter ability">Clear used aspects</li>
   </ul>
   <h4>If you gained an Advance:</h4>
   <ol>
      <li title="happens automatically">Clear lowest Condition</li>
      <li title="happens automatically">Recover 1 Eldritch Pool</li>
   </ol>
   <ul>
      <li>Change/Refine an aspect.</li>
      <li>Swap Adjacent Skills.</li>
   </ul>
   <h4>When Rank increases:</h4>
   <ol>
      <li>Add a new Skill Rank.</li>
      <li>Add a new Aspect.</li>
   </ol>
   <h4>After a Manifestation:</h4>
   <ol>
      <li>Recover EVERYTHING.</li>
      <li>Add a new Power and Pool</li>
   </ol>
   <button type="action" name="act_show_xp" class="hide-xp">Hide XP Panel</button>
</div>Code language: HTML, XML (xml)
This makes extensive use or ordered and unordered lists. We haven’t described them in the HTML section of the guide yet, but as you can see they allow you to show a bulleted or numbered list.
We might add CSS later to pretty up this section, but for now it doesn’t use any.
The Middle Column: XP Awards
This is divided into two sections, XP Questions and Achievements. At the end of each session, you are asked some questions, and if the answer os yes, you get 1 XP. This is a value of 0 or 1, perfect for a checkbox. Likewise, you may get up to 10 advancements, each of which gives 1 XP. Again, perfect for a checkbox.
We create an entry in carrington.json to hold two new objects:
"questions": [
   {"type": "checkbox", "value": "1", "label": "Heroism", "description": "Did my actions help to save someone from death (or a worse fate)"},
   {"1", "type": "checkbox", "value": "1", "label": "Relationship", "description": "Did we learn something new and important about one of the Heroes?"},
   {"type": "checkbox", "value": "1", "label": "Conclusion", "description": "Did we conclude an adventure this session?"},
   {"type": "number", "value": "0", "label": "Achievements?", "description": "How many achievements this Episode? (See the list to right.)"}
],
"achievements": [
   {"label": "Contacter", "description": "Create a new NPC during play"},
   {"label": "Creator", "description": "Create a situation aspect (Discover)"},
   {"label": "Imaginator", "description": "Declare a Story Detail"},
   {"label": "Inspirer", "description": "Help an ally by invoking their aspect"},
   {"label": "Introverter", "description": "Change or Define an Aspect"},
   {"label": "Magician", "description": "Use a Power without a roll"},
   {"label": "Manifestor", "description": "Use your first Manifestation"},
   {"label": "Sacrificer", "description": "Use a Sacrifice"},
   {"label": "Teamworker", "description": "Help another PC with their roll"},
   {"label": "Troublemaker", "description": "Compel an aspect of your own"}
]Code language: JSON / JSON with Comments (json)
We can then use handlebars code to extract the relevant parts of this in the main html:
<div class="questions">
   <h4>XP Questions</h4>
   {{#each questions}}
   <div class="show-through">
      <input type="{{this.type}}" class="question{{#if @last}} no-spinner{{/if}}" name="attr_question{{@key}}" value="{{this.value}}">
      <span class="display" class="question" title="{{this.description}}">{{this.label}}</span>
   </div>
   {{/each}}
   <h4>Achievements</h4>
   {{#each achievements}}
   <div class="show-through">
      <input type="checkbox" class="achievement" name="attr_achievement{{@key}}" value="1">
      <input type="checkbox" name="attr_achievement{{@key}}_stop" value="1" class="hidden">
      <span class="display" class="achievement" title="{{this.description}}">{{this.label}}</span>
   </div>
   {{/each}}
</div>Code language: Handlebars (handlebars)
The classes assigned here are mainly through habit, just in case they are needed. Except for one: on the hidden checkbox, class="hidden" is a special roll20 class that automatically assigns display:none; to the element.
The achievement input needs some styling though, both to fix its size and colour, and to get rid of those arrows. It’s an input of type number, and is the very last item in the array, so we can target it with those.
First we’ll create a class, no-spinner, which removes the arrows at the side of input boxes. Since we now have a class for that, we can add it to any text boxes where we want to hide those arrows, but don’t have to add it to all textboxes.
/* Chrome */
.ui-dialog .charsheet input.no-spinner::-webkit-outer-spin-button,
.ui-dialog .charsheet input.no-spinner::-webkit-inner-spin-button {
  -webkit-appearance: none;
  margin: 0;
}
/* Firefox */
.ui-dialog .charsheet input.no-spinner[type=number] {
    -moz-appearance: textfield;
}Code language: CSS (css)
Then we add some CSS to change the background colour and size. The colour is already being set in earlier code, so we just need to fix the size.
.ui-dialog .charsheet div.questions input[type="number"] {
    width: 20px;
    border: 2px solid grey;
}Code language: CSS (css)
Adding a grey border makes that box look more like the ones preceding it.
To get these sections to work properly, we’ll need some JavaScript. There are 10 achievement boxes (numbered 0-9). When any are checked or unchecked, we want to count up all checkboxes, reduce the sum by the number of locked boxes, and set the achievements question equal that total.
As a bonus, whenever anyone manually changes the achievement number, it should be reset to this total, and if a locked checkbox is unchecked, it should be rechecked (you can’t remove an achievement you have earned).
const seq = (length, start = 0) => [...Array(length).keys()].map(i => i += start);Code language: JavaScript (javascript)This code should count up the number of achievement boxes checked this session, and update that input box. That’s where the hidden input whose name ends in _stop comes in.
on(`change:question3 change:achievement0_stop ${seq(10).map(i => `change:achievement${i}_stop change:achievement${i}`).join(' ')}`, (event) => {
   getAttrs([...seq(10).map(i => `achievement${i}`), ...seq(10).map(i => `achievement${i}_stop`)], v => {
      if(event.sourceType == 'sheetworker') return;
      const output = {}
      let total = 0;

      seq(10).forEach(i => {
         // want to set a value if lock is 1.
         const l = int(v[`achievement${i}_stop`]);
         const a = Math.max(l, int(v[`achievement${i}`]));
         output[`achievement${i}`] = Math.max(a, l);

         total += a;
         total -= l;
      });
      output.question3 = total;
      setAttrs(output);
   });
});Code language: JavaScript (javascript)
Some of the code here isn’t obvious. Look inside seq(10).forEach – thats where the magic happens.
First, we get the current locked (or _stop) value. This is 0 or 1 (for if it has previously been set to 1). Then a sets the current, visible achievement checkbox – again either 0 or 1. Because the user might uncheck it, we set a minimum value equal to the locked box.
Then we set the checkbox again if the user has tried to uncheck a locked achievement. Finally, we calculate a running total for the achievement cost. Having change:question3 means that this code runs if the user tries to manually change the achievements. They always get reset to the calculated value.
In Conclusion
And there we have it. Most of the xp-floater is designed. The first column is the most complex, so we’ll cover that in the next post.
