- Campaign Settings for the Carrington Sheet
- The Sidebar Back of the Carrington Sheet
- The Sidebar Front of the Carrington Sheet
- Rolls and the Rolltemplate in the Carrington Sheet
- Wounds in the Carrington Sheet
- Eldritch Powers in the Carrington Sheet
- A variety of systems in the Carrington Sheet
- Buying an Ability in the Carrington Sheet
- How Many Abilities in the Carrington Sheet
- Managing Experience in the Carrington Sheet
- Adding a Description to the Carrington Sheet
- The Bio Tab in the Carrington Sheet
The back of the sidebar is meant to be more for the GM, and is divided into three sections: Fixes, Visuals. and Settings. I’ll describe Visuals first, because it has an effect on Fixes.
Abilities can look like either of these:
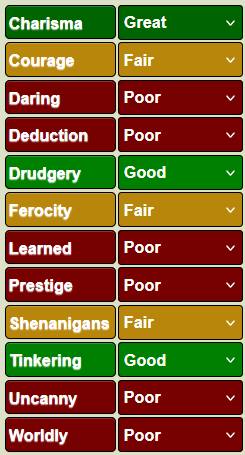
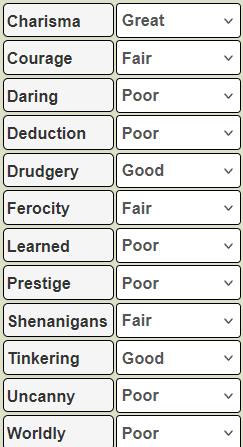

Table of Contents
Colouring The Abilities
The Colored Abilities button toggles between these two styles. The multi-coloured version colours an ability based on its rank, but some players prefer a cleaner look and they can switch between these here.
One way to do this would be to create separate copies of the buttons, one with the class for the colour style and one without. This is very clunky. But Roll20 recently introduced a more streamlined way to do it.
Roll20 introduced a limited version of JQuery for their character sheets. JQuery allows you to rewrite parts of a webpage dynamically, changing how the sheet works. Here we use JQuery to add or remove a CSS class to specific elements, and that class contains the style information.
Remember that we have a button for each ability like this:
<button type="action" name="act_charisma-button">
   <span>Charisma</span>
</button>Code language: HTML, XML (xml)
We need a unique class for each button, so we can identify just that button. That makes our code look more like this:
<button type="action" name="act_charisma-button" class="Charisma">
   <span>Charisma</span>
</button>Code language: HTML, XML (xml)
Through Handlebars, we can build all of the abilities very quickly.
{{#each abilities}}
<div class="ability">
   <button type="action" name="act_{{downcase this}}-button" class="{{this}}">
      <span>{{this}}</span>
   </button>
</div>
{{/each}}Code language: Handlebars (handlebars)
There’s also a select to give a rank dropdown, but that’s not relevant to this example. With this tiny bit of code, the entire HTML for all 12 abilities is created with the click of Generate! button.
We also need some CSS to colour the buttons, but that has already been created in the previous post, for the rank ladder. it looks like this:
.ui-dialog .tab-content .charsheet .Terrible {
    background-color: purple;
    color: white;
}
.ui-dialog .tab-content .charsheet .Poor {
    background-color: rgb(119, 0, 0);
    color: white;
}
.ui-dialog .tab-content .charsheet .Fair {
    background-color: darkgoldenrod ;
    color: white;
}
.ui-dialog .tab-content .charsheet .Good {
    background-color: green;
    color: white;
}
.ui-dialog .tab-content .charsheet .Great {
    background-color: darkgreen;
    color: white;
}
.ui-dialog .tab-content .charsheet .Superb {
    background-color: blue;
    color: white;
}
.ui-dialog .tab-content .charsheet .Spectacular {
    background-color: darkblue;
    color: white;
}
.ui-dialog .tab-content .charsheet .Legendary {
    background-color: black;
    color: white;
}Code language: CSS (css)
As noted, this was all created already. That’s one of the main advantages of using CSS: you can reuse the same code multiple times in the same project.
Finally, the JQuery part, in your script block. Note the sheet:opened part. Roll20’s version of JQuery has a limitation: it must be reset every time the sheet opens. So, this sheet worker does exactly that.
on(`sheet:opened change:eldritch change:colouring ${abilities.reduce((all, one)
      => `${all} change:${one}`,'')}`, () => {
   getAttrs([...abilities, 'Eldritch', 'colouring'], v => {
      [...abilities, 'Eldritch'].forEach(ability => {
         ranks.forEach(rank => {
            $20(`.charsheet .${ability}`).removeClass(rank);
         });
      });
      const colouring = int(v.colouring);
      if(!colouring) return;
      [...abilities, 'Eldritch'].forEach(ability => {
         ranks.forEach(rank => {
            if (v[ability] == rank) {
               $20(`.charsheet .${ability}`).addClass(rank); //``
            }
         });
      });
   });
});
Code language: JavaScript (javascript)
JQuery (or rollQuery) has its own (confusing!) syntax. The first JQuery line looks like this:
$20(`.charsheet .${ability}`).removeClass(rank);Code language: JavaScript (javascript)It begins with a CSS selector, which says what part of the sheet to select. This code cycles through all abilities so ${ability} will start with .Charisma. We assigned the Charisma class to that ability so it is selected.
Then it gives a command to carry out: .removeClass(rank). This cycles through every rank, so can be .removeClass(Terrible) or .removeClass(Good), and so on. We named the classes to be exactly the same as the ranks, so we could cycle through them here.
So that routine removes all rank-based classes that might be assigned. Now we just need to add the one class that should be applied, the one for the current rank. That’s what this code does:
if (v[ability] == rank) {
   $20(`.charsheet .${ability}`).addClass(rank);
}Code language: JavaScript (javascript)
This worker runs whenever a rank changes, then this code checks the current rank of that ability, and adds the class matching that rank. If you know what the code is doing, this is brilliant in its simplicity.
That just leaves this part to explain:
const colouring = int(v.colouring);
if(!colouring) return;Code language: JavaScript (javascript)
We need to be able to switch off the colouring entirely, so you get that second image above. The Colored Abilities button is a toggle to flip between 1 (coloured) and 0 (not coloured). The worker gets that value, 0 or 1. It says if Colouring is Off cancel the rest of the sheet worker, so no colouring is ever assigned.
To enable that, we need a little more code. The HTML for the colouring button under Visuals:
<input type="hidden" name="attr_colouring" value="1" class="colour-toggle">
<button type="action" name="act_colouring" class="title Good no-colour"
        title="Ability buttons are not coloured">
   <span>Abilities: No Color</span>
</button>
<button type="action" name="act_colouring" class="title Good colour"
        title="Ability buttons are coloured according to Rank">
   <span>Colored Abilities</span>
</button>Code language: HTML, XML (xml)
There are two buttons here, and through CSS and the value of the colouring input, one of them is always hidden. That CSS is in the previous post.
The JavaScript to toggle the value of the colouring input is in the previous post, but starts like this:
['whisper', 'query', 'power', 'aspect_advances', 'colouring'].forEach(w => {Code language: JavaScript (javascript)And that’s that. A fairly complex feature, and almost completely unneccessary!
Enabling and Disabling Warnings
Here’s another entirely unnecessary feature that requires a ridiculous amount of code, and which can be switched off!.
It is very easy to mark an aspect, or condition, or whatever. This means that players who don’t really know what they are doing can easily ruin the book-keeping value of a sheet and forget what they have actually used. So, what we do is make a prompt, “Are You Sure?” pop up each time players try to change anything, to give them a moment’s pause and think, “Do I really want to do that?”
And then, once set, each item is fixed and can’t easily be unset.
It takes a lot of code to set that up (see below). This button lets you switch that feature off. It creates a toggle, for on and off. This requires some very basic HTML and JavaScript – the CSS is already created.
Here we have the HTML for that button. It is linked with a hidden input. That could easily have been a tabs toggle as described earlier, but there’s a reason that approach wasn’t used.
<hidden type="number" name="attr_prompts" value="0">
<button type="action" name="act_prompt" class="title Good">
   <span name="attr_prompt_label">Warnings Disabled</span>
</button>Code language: HTML, XML (xml)
We also need a sheet worker, so the visible label changes from Warnings Disabled to Warnings Enabled. This why a span with a name was used – so that text could be easily changed.
on('clicked:prompt', () => {
   getAttrs(['prompts'], v => {
      const prompt = int(v.prompts);
      setAttrs({
         prompts: 1-prompt,
         prompt_label: `Warnings ${prompt ? 'Enabled' : 'Disabled'}`
      });
   });
});Code language: JavaScript (javascript)
Here we have a worker that is triggered when that button is clicked, and toggles that value between 0 and 1, and changes the button label to appropriate text.
Are You Sure?
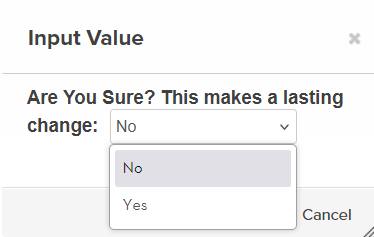
Now that we can set visible warnings. They are actually prompts which ask if you want to proceed.
There are two problems with these prompts. The red X in the upper right corner does nothing – that is always the case with Roll20 prompts, and there’s nothing can be done about that.
The second problem is the Cancel button does nothing. It might be possible to fix that, but I haven’t – that’s what the No option is there for. Use it!
So, this function is created p go with this prompt. Since several routines want to present this prompt, writing one function to do that and calling the function everywhere it’s needed is good practice. You can see several buttons listed here that call it.
const are_you_sure = (time) => {
   getAttrs(['prompts'], v => {
      const prompt = int(v.prompts);
      if(prompt) {
         time_clear(time);
      } else {
         const report_string = `Are You Sure? This makes lasting changes.`;
         startRoll(`!{{template:default}}{{ask=![[?{${report_string}|No,0|Yes,1}]]}}`, (question) => {
            const query = question.results.ask.result;
            if(query) {
               time_clear(time);
            }
         });
      }
   });
};
on('clicked:scene', () => {
   are_you_sure(0);
});
on('clicked:chapter', () => {
   are_you_sure(2);
});
on('clicked:clear', () => {
   are_you_sure(4);
});
on('clicked:manifest', () => {
   are_you_sure(5);
});Code language: JavaScript (javascript)
This particular version of the function passes a number to the time_clear function, which erases a lot of marks on the sheet based on how much time has passed. The worker for that is really long, but it just sets certain attributes to zero based on how much time has passed:
const time_clear = (time) => {
   // 0 = stress, 1 = scene, 2 = chapter, 3 = advance, 4 = manifest
   // scene: stress
   // chapter: seq(all).aspects, sacrifice, concession, section.knacks, powers_used
   // advance: 1 condition, 1 eldritch power
   // manifest: increase eldritch, clear EVERYTHING, including manifest
   // note: recovering an eldritch power each chapter or advance is an optional setting.
   getSectionIDs(`repeating_knacks`, ids => {
      getAttrs(['eldritch', 'eldritch_pool', 'eldritch_pool_max',
            'character_rank', 'timing',
            ...seq(5).map(i => `condition${i}_check`)], values => {
         let eldritch = values.eldritch;
         let xp = values.character_rank;
         let eldritch_rank = ranks.indexOf(eldritch) || 1;
         let xp_rank = ranks.indexOf(xp) || 1
         let timing = int(values.timing);
         let pool = int(values.eldritch_pool);
         let max = int(values.eldritch_pool_max);
         if (time >= 3) {
            pool = 0;
            max += 1;
         }
         const output = {};
         if (time >= 0) {            //scene
            output.stress = 0;
         }
         if (time >= 1) {     // compel clears aspects
            seq(11).forEach(i => {
               output[`aspect${i}_check`] = 0;
            });
         }
         if (time >= 2) {     //chapter
            ids.forEach(row => {
               output[`repeating_knacks_${row}_knack_check`] = 0;
            });
            if(pool < max || time >= 2) {
               seq(7,2).forEach(i => {
                  output[`eldritch_${i}_check`] = 0;
               });
               output.maxed_out = 0;
            } else {
               seq(7,2).forEach(i => {
                  output[`eldritch_${i}_check`] = 0;
               });
               output.maxed_out = 1;
            }
            output.powers_used = 0;
            output.compel = 0;

            if (xp_rank > eldritch_rank || time >= 4) {
               output.manifest_allowed = 1;
            } else {
               output.manifest_allowed = 0;
            }
            // if sacrifices and compels clear per Chapter.
            if(!timing) {
               output.sacrifice = 0;
               output.concession = 0;
            }
         }
         if (time >= 3) {     //advance

            if(timing) {
               output.sacrifice = 0;
               output.concession = 0;
            }
            pool = Math.max(0, pool- 1);
            output.eldritch_pool = pool;
            let not_found = true;
            seq(5).forEach(i => {
               if(not_found && int(values[`condition${i}_check`])) {
                  not_found = false;
                  output[`condition${i}_ability`] = "";
                  output[`condition${i}_check`] = 0;
               }
            });
         }
         if (time >= 4) {     //clear
            output.eldritch_pool = 0;
            seq(5).forEach(i => {
               output[`condition${i}_check`] = 0;
               output[`condition${i}_ability`] = "";
            });
         }
         if (time >= 5) {
         //manifest, increases Eldritch, sets manifest to not allowed
            output.manifest_allowed = 0;
            output.eldritch = ranks[eldritch_rank +1] || 'Poor';
         }
         setAttrs(output);
      });
   });
};Code language: JavaScript (javascript)
There are several other workers that use the Are You Sure prompt, but use it in different ways so it’s not linked to this function. The basic process is repeated though.
Fixes
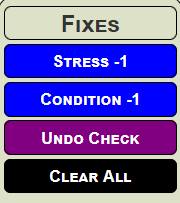
This entire section is only needed because of the Warnings feature just created. Sometimes when you add something to the character sheet, like use an aspect or a power, or mark a Condition or Stress, you are asked if you really want to do that, and if you accept it, you can’t remove that mark. If you make a mistake, and mark something you shouldn’t have, this is inconvenient. These fixes allow you to remove those things.
Stress -1
This is very simple, because which stress bubbles are present and marked depends on a hidden stress attribute. We just need a worker to reduce the Stress score by one, and those bubbles will fix themselves.
The current form of the worker is very complex, but this is because it handles the Warning above.
on('clicked:stress-', () => {
   getAttrs(['prompts', 'stress'], v => {
      const prompt = int(v.prompts);
      const stress = int(v.stress);
      if(prompt) {
         setAttrs({
            stress: Math.max(0, stress-1)
         });
      } else {
         const report_string = `Are You Sure? This clears all checks and Stress`;
         startRoll(`!{{template:default}}{{ask=![[?{${report_string}|No,0|Yes,1}]]}}`, question => {
            const query = question.results.ask.result;
            if(query) {
               setAttrs({
                  stress: Math.max(0, stress-1)
               });
            }
         });
      }
   });
});Code language: JavaScript (javascript)
Here is what the worker is really doing, without those warnings. You can see at heart it is very simple.
on('clicked:stress-', () => {
   getAttrs(['stress'], v => {
      const stress = int(v.stress);
      setAttrs({
         stress: Math.max(0, stress-1)
      });
   });
});Code language: JavaScript (javascript)
As you see, it just reduces the stress score by 1, to a minimum of 0. (It never sets stress to a negative value.) The longer version uses Custom Roll Parsing to ask for permission first.
Condition -1
Each Condition might be marked or not, and there can be three entries for each Condition: the mark, the Disablement, and a (usually hidden) Description (just click the condition name to see it).
Worse, the Conditions might be marked in any order – you might have the second marked, but not the first or third. This routine needs to find which conditions are marked, then clear only the last of them and leave the rest alone.
Here’s the final monstrosity – let’s look at why it’s built this way.
on('clicked:condition', () => {
   getAttrs(['prompts', ...seq(5).map(i => `condition${i}_check`)], v => {
      const prompt = int(v.prompts);
      const output = {};
      let not_found = true;
      [4,3,2,1,0].forEach(i => {
         if(not_found && int(v[`condition${i}_check`])) {
            not_found = false;
            output[`condition${i}_ability`] = "";
            output[`condition${i}_details`] = "";
            output[`condition${i}_check`] = 0;
         }
      });

      if(prompt) {
         setAttrs(output);
      } else {
         const report_string = `Are You Sure? This clears all checks and Stress`;
         startRoll(`!{{template:default}}{{ask=![[?{${report_string}|No,0|Yes,1}]]}}`, (question) => {
            const query = question.results.ask.result;
            if(query) {
               setAttrs(output);
            }
         });
      }
   });
});Code language: JavaScript (javascript)
Note that with no Are You Sure prompt, it would look a bit simpler, but still not simple. Let’s look at this version first.
on('clicked:condition', () => {
   getAttrs([...seq(5).map(i => `condition${i}_check`)], v => {
      const output = {};
      let not_found = true;
      [4,3,2,1,0].forEach(i => {
         if(not_found && int(v[`condition${i}_check`])) {
            output[`condition${i}_ability`] = "";
            output[`condition${i}_details`] = "";
            output[`condition${i}_check`] = 0;
            not_found = false;
         }
      });

      setAttrs(output);
   });
});Code language: JavaScript (javascript)
There are five conditions on the sheet (numbered 0 to 4). Only 3 start out visible, but players can gain up to two more, and the sheet has them so we need to account for them here.
Each condition has a check mark, which will be ticked (gaining a value of 1) when the character is suffering from that condition. So a forEach routine running in reverse order (4,3,2,1,0) can find them each in turn.
Then we create a not_found Boolean value (it starts out at true). The purpose of this variable is to ensure the code does not run after it has found any marked condition – once it is set to false, it stays that way and makes sure this part of the code never runs.
So, if any conditions are marked, the values for the last of them are saved into output, and it is set at the end of the worker.
The longer version of the worker simply adds the check to see how someone responded to the Are You Sure question. The values stored in output are still there, so can be set if appropriate and ignored if now.
Undo Check
There are a lot of things you might have checked, like Aspects, Knacks, Powers, and whether you have marked the sacrifice or concession box. This button allows you to pick one thing that is marked, and clear that mark. (You an use it several times to unmark several things.)
When you click it, you’ll get a drop down showing only those things that have already been checked, and not Stress or Conditions which have their own clear routines.
A complication is that several things are tracked in different ways, and the button needs to account for all of them. Here is the sheet worker that does that.
on('clicked:resources', () => {
   getSectionIDs('repeating_knacks', ids => {
      const fields = ids.reduce((all, id) =>
         [...all, section_name('knacks', id, 'knack_check'),
         section_name('knacks', id, 'knack')], []);

      getAttrs([...fields, ...seq(11).map(i => `aspect${i}_check`),
            ...seq(11).map(i => `aspect${i}`),
            ...seq(7,2).map(i => `eldritch_${i}_check`),
            ...seq(7,2).map(i => `eldritch_${i}`),
            'sacrifice', 'concession', 'compel', 'eldritch_pool'], v => {
         let list = [];
         const no_checks = ['sacrifice', 'concession'];
         no_checks.forEach(w => {
            if(v[w] == "1") list.push(w);
         });
         Object.keys(v).forEach(w => {
            if(w.endsWith('_check') && v[w] == "1") {
               list.push(w.replace('_check', ''));
            }
         });
         const list_string = list.map((w, i) =>
               `${no_checks.includes(w) ? w : v[w]},${i+1}`).join('|');
         const report =
`!{{template:default}}{{ask=![[?{Choose what to Undo|Cancel,0|${list_string}}]]}}`;

         startRoll(report, question => {
            const query = question.results.ask.result;
            if(query) {
               const list_item = list[query -1];
               let item = '';
               if(no_checks.includes(list_item)) {
                  item = list_item
               } else {
                  item = list[query -1] + '_check';
               }
               const output = {};
               output[item] = 0;
               if(item.startsWith('eldritch')) {
                  const pool = v.eldritch_pool;
                  output.eldritch_pool = Math.max(pool -1, 0);
                  output.maxed_out = 0;
               }
               setAttrs(output);
            }
         });

      });
   });
});Code language: JavaScript (javascript)
This sheet worker could be worth a post on its own but I’m kind of exhausted right now. If you have any questions about it, I’m happy to answer.
Clear All
Sometimes you just want to reset everything. Remove all usage markers from everything. You probably don’t want to do this on a real character, but it was very handy during testing.
This is an extremely simple button. It just triggers the Are You Sure function above on the highest level:
on('clicked:clear', () => {
   are_you_sure(4);
});Code language: JavaScript (javascript)
This demonstrates the value of using functions to repeat code. There is a lot of code hidden beyind that function, but we can call it with a single line.
Campaign Settings
Finally, we have a button to hide this version of the back of the Sidebar, and display campaign settings. This will include a number of settings that are only used by GMs when setting up the campaign, and which can be set just once when loading the campaign.
This does use the tabs routine, expanding it to this:
const tabs = {
   toggles: ['biotoggle', 'lock', 'show_xp', 'config', 'font', 'settings'],
};
run_tabs(tabs);Code language: JavaScript (javascript)
For this, we need both some HTML and CSS. The HTML comes in two stages. First a hidden input right at the top of the sidebar, along with the config value:
<div class="sidebar grid-box">
   <input type="hidden" name="attr_config" value="0" class="config-hide">
   <input type="hidden" name="attr_settings" value="0" class="show-settings">Code language: HTML, XML (xml)
Notice it has a class – that is used with CSS later.
Then we need a button and divs.
   <div class="config">
      <button type="action" name="act_settings" class="title settings">
      <h3>Settings</h3>
      </button>
   </div>
   <div class="settings">
       <!-- stuff will go here -->
   </div>Code language: HTML, XML (xml)
Finally, we add some CSS code to make this work. This code hides everything in the sidebar when the button is clicked, and only the new settings div is visible. If that button is clicked again, it is hidden and everything else resumes the value it had before.
div.sidebar .show-settings[value="0"] ~ .settings,
div.sidebar .show-settings[value="1"] ~ .config,
div.sidebar .show-settings:not([value="0"]) ~ .visuals,
div.sidebar .show-settings:not([value="0"]) ~ .fixes,
div.sidebar .show-settings:not([value="0"]) ~ .rolls,
div.sidebar .show-settings:not([value="0"]) ~ .ladder,
div.sidebar .show-settings:not([value="0"]) ~ .refresh {
   display: none;
}Code language: CSS (css)
Final Thoughts
Whew, that’s that. The sidebar has very infrequent use but has some very demanding code.
