- Custom Roll Parsing: A Detailed Example
- CRP: Damage Rolls in Champions
- CRP: Fudge and Fate
- CRP: Criticals on Multiple Dice (HERO and GURPS)
- CRP: OctaNe and Inspectres
- CRP: Essence 20
- CRP: Spell Slots
- CRP: A Simple Example
The last month of articles have focussed on explaining Custom Roll Parsing, so in theory you should be able to build complex rolls using it now. But it’s a complex topic, and examples might help, so in this month of November we’ll be focussing on exactly that. Each weekly post will be a complete Custom TRoll Parsing example from beginning to end. Some of these examples will be for real systems, so you can see one way of solving those, and others will be invented examples. All examples will showcase things you can’t do with roll or action buttons alone.
In this post, we’ll look at how you might create a universal CRP – something where the player can enter any roll they want, manually.
What Do We Need To Do?
We’ll need to break down the project into several steps
- HTML: we’ll need to set up elements for each roll. We need a visible label, a place to enter the roll, and a button to launch that. There might not be a fixed number, so this might be a repeating section.
- Sheet Worker: This is the meat of the CRP. We’ll need a worker that is triggered by any of the buttons above, and which can read the code expression from the above elements. Then it’ll need to make a roll, and return the result to a roll template (it should be a simple
startRollandfinishRollroutine). - Roll Template: are we using the default rolltemplate? If so, we don’t need any work here. That should be one of the first questions you answer. In this case, we’ll use a ciustom roll template, with a title, and which displays the code and the result of a roll.
- CSS: We’ll need CSS for the HTML Elements and also for the roll template. We could break this into two separate steps, and do the CSS for the HTML elements at the same time as those.
Now we know what the project includes, we can start on it. This is looking like a fairly simple project (for CRP!). For some projects one or more of these questions will be answered ahead of time (you might work with a largely pre-existing HTML and CSS layout for example, but here we are building from scratch).
HTML Elements
A real character sheet would likely need more, but for our function we only need this:
<fieldset class="repeating_custom">
    <input type="text" name="attr_label" placeholder="ENTER NAME" value="">
    <input type="text" name="attr_code" placeholder="ENTER CODE" value="1d20">
    <button type="action" name="act_roll">Roll</button>
</fieldset>Code language: HTML, XML (xml)
With our first entry, and accepting basic styling, that looks like:

We’d probably want, at the very least, to alter the widths of some elements and height of the roll button. But we don’t need to do that for this example.
Sheet Worker
The Repeating Section
Since we are using a repeating section, we need to set up the basic framework to collect the values we need. For each row in the section, we need a label and a code value. If necessary, you should refresh your memory with repeating sections, and especially the Function Library post.
    const section_name = (section, id, row) => `repeating_${section}_${id}_${row}`;
    on('clicked:repeating_custom:roll', event_info => {
        getSectionIDs('repeating_custom', id_array => {
            const fields = id_array.reduce((all, id) => [...all,
                  section_name('custom', id, 'label'),
                  section_name('custom', id, 'code')], []);
        });
        getAttrs(fields, values => {
            console.log(values);
        });
    });Code language: JavaScript (javascript)
The console.log command will be replaced later, but we can for now test that it’s reporting the correct values. After a few typo corrections, our console command shows us this:
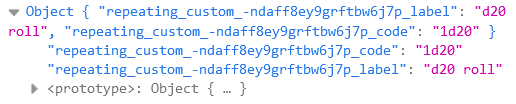
Wer can see the full addresses of our single code and label entries so far, so that tells us everything so far is working correctly. We can move on to the next step.
Building the Roll String
For this function, we don’t actually need the full details of every roll. It’s easy to imagine a function which outputs a complete set of chat buttons, one for every roll, but we aren’t doint that this time.
So we need to know which row is being triggered. Since every roll is triggered by the roll button for that rowq, we can get its name through the eventInfo object, and trim it down to just the row id.
Then we’ll use the incredibly useful section_name function to build a roll string, and then make our first roll.
           getAttrs(fields, values => {
                const trigger = event_info.triggerName;
                const id = trigger.split('_')[2];
                const roll = values[section_name('custom', id, 'code')];
                const label = values[section_name('custom', id, 'label')];
                const roll_string = `&{template:default} {{name=${label}}} {{roll=${roll} }} {{result=[[${roll}]] }}`;
                console.info({roll_string});
            });Code language: JavaScript (javascript)
We replace the console statement above with this code. Now we can look to see if the roll string being built is correct. The console shows us this:

That looks good. The eagle-eyed will notice we are using the default template for now. That’s a great way to test test rolls. We’ll change to our actual rolltemplate later, after it’s actually built.
Testing The Roll
We just need to replace that console command with startRoll and finishRoll, like this:
const section_name = (section, id, row) => `repeating_${section}_${id}_${row}`;
on('clicked:repeating_custom:roll', event_info => {
getSectionIDs('repeating_custom', id_array => {
const fields = id_array.reduce((all, id) => [...all,
section_name('custom', id, 'label'),
section_name('custom', id, 'code')], []);
getAttrs(fields, values => {
const trigger = event_info.triggerName;
const id = trigger.split('_')[2];
const roll = values[section_name('custom', id, 'code')];
const label = values[section_name('custom', id, 'label')];
const roll_string = `&{template:default} {{name=${label}}} {{roll=${roll} }} {{result=[[${roll}]] }}`;
startRoll(roll_string, roll => {
finishRoll(roll.rollId)
});
});
});
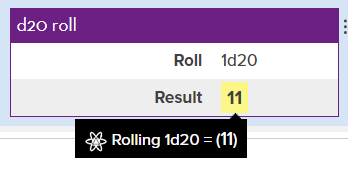
});Code language: JavaScript (javascript)Now with the complete worker, we can test the roll:
That is working perfectly – now we need to create the custom roll template.
Roll Template
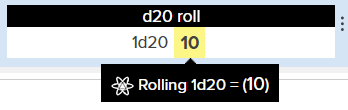
We are creating a custom roll template. For that we need both HTML and CSS, but we also need a vision in our heads of what the roll is meant to look like in chat. For this example, we’ll keep it simple. We want it to look like this:
The rolltemplate is initially designed in HTML, like so:
<rolltemplate class="sheet-rolltemplate-custom">
    <div class="heading">{{name}}</div>
    <div class="results">
        <div class="roll">{{roll}}</div>
        <div class="result">{{result}}</div>
    </div>
</rolltemplate>Code language: HTML, XML (xml)
Here we have a title, and the results placed in their own div so we can use CSS Grid to arrange them into columns.
Or first roll, without styling, looks like this:
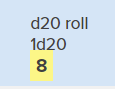
It’s obviously working. Now we need to add CSS.
Roll Template CSS
The rolltemplate still uses Legacy code. That means each element must be preceded with sheet-.
.sheet-rolltemplate-custom {
    background: white;
}
.sheet-rolltemplate-custom .sheet-heading {
    background: black;
    color: white;
    text-align: center;
}
.sheet-rolltemplate-custom .sheet-results {
    display: grid;
    grid-template-columns: 49% 49%;
    column-gap: 2%;
    line-height: 1.8em;
}
.sheet-rolltemplate-custom .sheet-results div:first-child {
    text-align: right;
}Code language: CSS (css)
Each seperate div container has its own styling. You can examine what each does, and possibly refresh your memory at the CSS page.
Finishing Touches
Whew, now we have a complete, ‘simple’, working example of custom roll parsing. Enjoy! Here is the full code.
HTML
<fieldset class="repeating_custom">
    <input type="text" name="attr_label" placeholder="ENTER NAME" value="">
    <input type="text" name="attr_code" placeholder="ENTER CODE" value="1d20">
    <button type="action" name="act_roll">Roll</button>
</fieldset>

<rolltemplate class="sheet-rolltemplate-custom">
    <div class="heading">{{name}}</div>
    <div class="results">
        <div class="roll">{{roll}}</div>
        <div class="result">{{result}}</div>
    </div>
</rolltemplate>Code language: HTML, XML (xml)
CSS
.sheet-rolltemplate-custom {
    background: white;
}
.sheet-rolltemplate-custom .sheet-heading {
    background: black;
    color: white;
    text-align: center;
}
.sheet-rolltemplate-custom .sheet-results {
    display: grid;
    grid-template-columns: 49% 49%;
    column-gap: 2%;
    line-height: 1.8em;
}
.sheet-rolltemplate-custom .sheet-results div:first-child {
    text-align: right;
}Code language: CSS (css)
Sheet Worker
const section_name = (section, id, row) => `repeating_${section}_${id}_${row}`;
on('clicked:repeating_custom:roll', event_info => {
  getSectionIDs('repeating_custom', id_array => {
    const fields = id_array.reduce((all, id) => [...all,
      section_name('custom', id, 'label'),
      section_name('custom', id, 'code')], []);
    getAttrs(fields, values => {
      const trigger = event_info.triggerName;
      const id = trigger.split('_')[2];
      const roll = values[section_name('custom', id, 'code')];
      const label = values[section_name('custom', id, 'label')];
      const roll_string = `&{template:custom} {{name=${label}}} {{roll=${roll} }} {{result=[[${roll}]] }}`;
      startRoll(roll_string, roll => {
        finishRoll(roll.rollId)
      });
    });
  });
});Code language: JavaScript (javascript)
Final Note
It has been pointed out that you can do this particular example via more traditional means. That’s true, this example is a demonstration, bringing together a lot of the stuff dicussed over the past month. But it l;ays the groundwork for some upcoming articles which you absolutely can’t do with more traditional means, and you’ll need to be able to follow the basic structure to fully understand them.
