- Using a Rolltemplate
- The Rolltemplate Container
- The Structure of a Rolltemplate
- Styling a Rolltemplate
- rollTemplate Keys and Values
- Using Logic In a Rolltemplate
- What to Show in rollTemplates
- Buttons in Rolltemplates
- Special Styles for Rolltemplates
- Rolltemplate Gotchas
- Customizing the Default rolltemplate
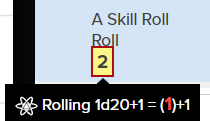
In the last post, we created a simple layout which outputted this set of results.
We need to style it more attractively. That’s the focus of this post.
Basic Styling
We have some div blocks each with their own class. We can target those in CSS. It used to be common to use HTML tables to lay out the result of a relltemolate, and you’ll see experiments doing that. But you should not do that – the method is obsolete, and there is better code now.
In the last post, we created HTML that looked like this
<rolltemplate class="sheet-rolltemplate-simple-roll">
   <span class="sheet-template-title">
      {{title}}
   </span>
   <span class="sheet-roll-title">
      Roll
   </span>
   <span class="sheet-roll-result">
      {{roll}}
   </span>
</rolltemplate>Code language: HTML, XML (xml)
The pevious post talked about the structure, and next will talk about the weird {{ }} brackets in more detail. For now, we have a set of divs and other elements, each of which have classes we can target in CSS. And so…
We want to create a set of columns. First we add the columns with CSS Grid, then make the title section spread across both columns.
.sheet-rolltemplate-simple-roll {
    display: grid;
    grid-template-columns: 45% 45%;
    column-gap: 10%;
}
.sheet-rolltemplate-simple-roll .sheet-template-title {
    grid-column: 1 / -1;
}Code language: CSS (css)
Creating a display: grid and grid-template-columns creates the columns. This affects all elements one level below the sheet-rolltemplate-simple-roll class, which is all those divs. But the top div is the title, and we need to make sure it spreads across all columns. That’s what the grid-column command does. Now we have this:

It’s laid out better, but still looks a bit plain.
A splash of colour would make it stand out, so lets add that (well, not colour, exactly).
.sheet-rolltemplate-simple-roll {
    background-color: white;
}
.sheet-rolltemplate-simple-roll .sheet-template-title {
    background-color: black;
    color: white;
}Code language: CSS (css)
Here, we have made the entire output white, and the title bar black. That gives us:

It is more striking, there are still issues.
In the picture, the labels could be closer to the value, and the height of the rows could be expanded. There are 3 spans, so we can set every even numbered column to be right aligned. Then change the height of each line so that inlinerolls dont eat part of the title.
.sheet-rolltemplate-simple-roll div:nth-child(even)  {
    text-align: right;
}
.sheet-rolltemplate-simple-roll div:nth-child(1) {
    text-align: center;
}
.sheet-rolltemplate-simple-roll {
    line-height: 1.9em;
}Code language: CSS (css)
We want to right-align the second div so the label “Roll” is close to its result. There are three divs, but we only want to affect the second. There are several ways to do this, but here we use nth-of-child, which lets you target all children of an item – the divs under the sheet-rolltemplate-simple-roll class.
Since there are three and we only want the second, we can use an even rule – hence the first line.
It would be nice to centre-align the title, and we can get that using the same rule – only here using as number: 1 for the 1st item. (Sometimes things start at 0, and sometimes they start at 1.)

With a little line-height tweaking, we end up with:
It is more striking, but there are still issues.
One of the things you can do with CSS is have separate declaration blocks which target the same blocks. Now we are putting them together.
.sheet-rolltemplate-simple-roll {
    display: grid;
    grid-template-columns: 45% 45%;
    column-gap: 10%;

    background-color: white;
    line-height: 1.9em;
}
.sheet-rolltemplate-simple-roll .sheet-template-title {
    grid-column: 1 / -1;

    background-color: black;
    color: white;

    text-align: center;
}
.sheet-rolltemplate-simple-roll div:nth-child(even)  {
    text-align: right;
}
.sheet-rolltemplate-simple-roll div:nth-child(1) {
    text-align: center;
}Code language: CSS (css)
There’s a lot more we can do to style that, like add borders, but this is not a CSS guide- there’s a whole section of the site for that. We are keeping things simple, and showing the same principles work.
In the next post, we’ll have a deeper look at keys and values, and the very important allProps function.
Aside: The code examples above use divs for simplicity. Sometimes you’ll want to use <spans> or <p> or even <h2> and other headings then apply your own styling. The goal here is explaining rolltemplates and not CSS.
