- Anatomy of a Sheet Worker
- Variables – How to Name Things
- Arithmetic in Sheet Workers
- What If? in Sheet Workers
- Arrays and Dropdowns
- JavaScript Objects
- Getting Loopy With JavaScript
- Strings in Sheet Workers
- Logging in the Browser Console
- Strings, Arrays, and Loops
- Undefined and Other Error Values
- Asynchronicity and Things to Avoid With Loops
- Events, and watching Attributes
- Changes and the eventInfo Object
- Action Buttons
- setAttrs and Saving Attributes
- The Ternary Operator – The One-Line If
- Template Literals
- Functions and the Fat Arrow
- A Sheet Worker Reprise
- Castle Falkenstein Design – Sheet Workers
- The Perils of Sheet Worker Functions
- The Script Block and Identifying Characters
You’ll often want to calculate things automatically like roll20, like figure out a stat bonus or a total attack bonus. Sheet workers are the best way to do this. You might already know how to use AutoCalc fields, and they are very simple to use, but they have a few major failings and are incompatible with sheet workers.
Luckily, nearly all sheet workers look the same so it’s often pretty easy to adapt someone else’s sheet worker to your own evil ends.
Two Examples of Sheet Workers
Here are two basic sheet workers. Have a look and see what they have in common.
on('change:strength', function() {

  getAttrs(['strength'], function(values) {

    let score = parseInt(values.strength) || 0;

    let modifier = Math.floor(score/2) -5

    setAttrs({
      strength_mod: modifier
    });
  });
});Code language: JavaScript (javascript)on('change:constitution change:size', function() {
getAttrs(['constitution', 'size'], function(values) {
let con = parseInt(values.constitution) || 0;
let size = parseInt(values.size) || 0;
let hit_points = con + size;
setAttrs({
hit_points: hit_points
});
});
});Code language: JavaScript (javascript)The left sheet worker calculates a D&D-style stat bonus, and the right side adds two attributes together to calculate hit points the way you would in RuneQuest or Call of Cthulhu.
Notice how much those sheet workers have in common. Each sheet worker is divided into five distinct sections as shown in these garish pictures:
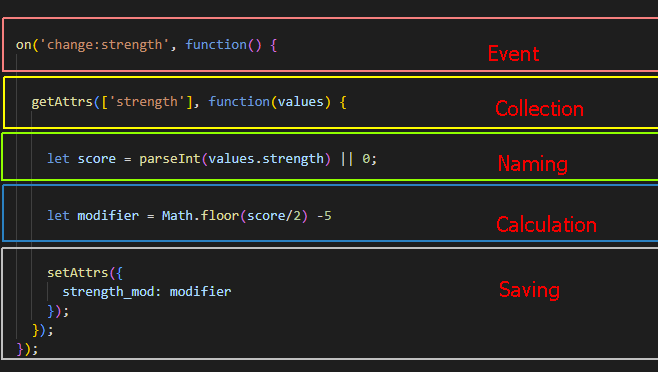
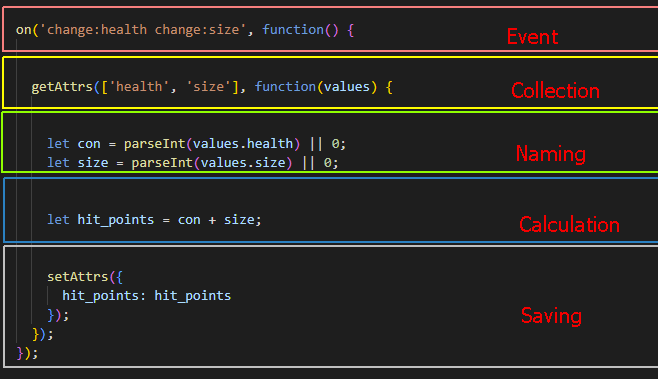
You can think of the five sections as Event, Collection, Naming, Calculation, and Saving. Posts following this will describe each section in detail, and describe why they work the way they do. In this post, you’ll just learn how to use the sections without needing to fully understand them.
Plan
So you have a sheet worker in mind. Does it calculate a stat modifier, add multiple stats together to calculate hit points or attack bonus, or look at a table to get speed or carrying capacity?
Whatever it does, make a note of which attributes are needed in the calculation, and then proceed.
In the event line, you tell Roll20 what events to watch for. For now, the only events we are concerned with are changes in attributes. If strength changes from 11 to 12, its modifier needs to be recalculated, and when constitution or size change, hit points need to update.
Every event line starts like this:
on('', function() {Code language: JavaScript (javascript)Then add the attributes you need between the quotes, with the word change: before them. If there is more than one, add a space between them, like so:
on('change:constitution change:size', function() {Code language: JavaScript (javascript)That’s all there is to it. There’s one small gotcha:
Attributes must be in lower case here (and only here) – if your attribute is named Strength, you must still write change:strength here. This only applies to the event line, but it’s a good idea to make all your attribute names lower-cased, so you don’t have to remember this rule.
(Note: sometimes will work if you use upper case, but sometimes it won’t, and if you have an error it will be frustrating to find the issue. So always use lower case here and avoid the problem.)
A sheet worker knows nothing about the character sheet it is part of. Sheet workers don’t automatically know the attributes and their values on the sheet – you need to tell the sheet worker which ones to get. That’s what this part of the sheet worker does.
The first line of each collection section starts off like this:
getAttrs([ ], function(values) {Code language: JavaScript (javascript)All you need to do is put the attributes between the [ ]. Each attribute must be between quotes, and separated by a comma (the space is optional), like so:
getAttrs(['constitution', 'size'], function(values) {Code language: JavaScript (javascript)And that’s it. One thing to realise: you only need to put attributes whose values you need to read from the sheet. If you are creating or overwriting attributes, you might not need to grab their values, so they aren’t needed here.
In the Collection phase, the sheet worker collected all the attributes and stored their name and value in the values object. That’s what the function(values) at the end of that line represents.
But to actually use the attributes, it’s easiest to extract the attributes from the values object and store them in a variable. That’s what lines like this are for:
let score = parseInt(values.strength) || 0;Code language: JavaScript (javascript)let con = parseInt(values.constitution) || 0;
let size = parseInt(values.size) || 0;Code language: JavaScript (javascript)These lines create variables called score, con, and size respectively. You’ll see how they are used in the next tab. The format is always the same:
let variable = parseInt(values.attribute) || 0;Code language: JavaScript (javascript)Simply replace the word variable with whatever name you want to use in the calculation, and attribute with the attribute’s name.
You can name the variable the same as the attribute – I probably should have done that in these examples. So this is fine:
let strength = parseInt(values.strength) || 0;Code language: JavaScript (javascript)let constitution = parseInt(values.constitution) || 0;
let size = parseInt(values.size) || 0;Code language: JavaScript (javascript)Note that you end each line with a semi-colon.
Here you perform any arithmetic you’d perform in a sheet worker, using variables in place of attribute names. The usual arithmetic operators (+-*/) are available, and BODMAS or PEMDAS rules are in effect, so you can do things like (3+2) *3 +7 and get the correct answer.
You need to store the result of any calculation in a variable. For example:
let modifier = Math.floor(score/2) -5;Code language: JavaScript (javascript)let hit_points = con + size;Code language: JavaScript (javascript)For simple sheet workers, the format is the same. You start with this:
let variable = ;Code language: JavaScript (javascript)Change variable to whatever name you want to use. Then include the arithmetic you need before the semi-colon, using any variables you already created.
There are some special functions. For rounding, use Math.floor() to round down, Math.ceil() to round up, and Math.round() to round to the nearest.
There are a bunch of other functions, but for replacing AutoCalcs, that should cover nearly everything you need to do.
Multiple Results
One advantage of sheet workers over AutoCalcs is that you can calculate multiple results in the same sheet worker. Say carrying capacity, damage bonus, and a general strength bonus are all based on your strength score. You could calculate them all together like this:
let modifier = Math.floor(score/2) -5;
let carry = score *2 + 100;
let damage_bonus = Math.round(score/5);Code language: JavaScript (javascript)
These aren’t meant to represent any game system but are just examples of calculations.
As with Naming, end each line with a semi-colon.
The final step: you have calculated a result. That result now needs to be saved to the character sheet. This section of the sheet starts off like this:
    setAttrs({

    });
  });
});Code language: CSS (css)
All you need to do is enter the attributes name on the sheet, with the result after a colon, like
    setAttrs({
      strength_mod: modifier
    });
  });
});Code language: CSS (css)
The name of the attribute on the sheet goes on the left, and the name of your calculated value goes on the right.
If you calculated multiple results in the same worker, separate them with a comma and a line break like this:
    setAttrs({
      strength_mod: modifier,
      carry_cap: carry,
      damage_mod: damage_bonus
    });
  });
});Code language: CSS (css)
The last one doesn’t have a comma after it. Don’t do this:
    setAttrs({
      strength_mod: modifier,
      carry_cap: carry,
      damage_mod: damage_bonus,
    });
  });
});Code language: CSS (css)
It seems like a small thing – but that will break the worker.
Note also the series of closed brackets there closes all the brackets opened up to this point. The event line has on(‘change:something’, function() {, the Collection line has getAttrs([‘something’],function(values0 {, and the saving line has its own ({ brackets. You need to close all of those brackets.
Summary
And that’s it. When you are starting out, every sheet worker is created the same way. The event, collection, naming, and saving lines all follow the same format, and you just need to follow the guidelines listed here. The Calculation is the part that varies but is pretty simple for this post. Later posts will show how this can become much more complex.
- Event: on(‘change:attribute1 change:attribute2’), function({ – change:attribute in lower case. The whole list of attributes goes inside one set of quotes.
- Collection: getAttrs([‘attribute1’, ‘attribute’], function(values) { – each attribute in its own quotes, separated by commas.
- Naming: let stat1 = parseInt(values.attribute1) || 0;
- Calculation: perform simple arithmetic: let result = stat1 + stat2;
- Updating: setAttrs({attribute3: result}); – multiple attributes are separated with commas, and don’t put a comma on the last one.
Other Details To Keep In Mind
This is a very simple thing. Sheet workers go inside the html page, but they go in a special script block. Put this at the end of your html page:
<script type="text/worker">

/* all sheet workers go here */

</script>Code language: JavaScript (javascript)
So, create that at the end of your HTML, and put all of your sheet workers inside it.
You can technically create separate script blocks, one for each sheet worker, and put them wherever you want in the html page, but there are advantages to doing it this way and it’s just more efficient.
On the forums or Wiki, someone might mention the script block – this is what they are referring to.
When creating attribute names in the HTML, it’s a good idea to follow these rules:
- Always use lower case.
- Don’t use spaces, and use only letters, numbers, and underscores.
- Never start an attribute name with a number.
None of these rules are required but using them will make things a lot easier for you when writing sheet workers. I’ll explain why in the next post.
Another suggestion: if you need multiple words, use camel case (camel_case) or kebab case (kebab-case). My preference is camel case (with underscores) because it makes sheet worker syntax easier, as you’ll discover. But there are a couple of places in Roll20 where you can’t use camel case (detailed later), and my recommendation there is to just use single word names.
The biggest mistake people make is probably not realising that sheet workers are completely incompatible with disabled fields.
You might have started with an autocalc input like this:
<input type="number" name="attr_hp" value="@{constitution}+@{size}" disabled> Code language: HTML, XML (xml)But in changing it to a sheet worker, you forget that disabled part causes it to fail. You’d need to change it to something like this:
<input type="number" name="attr_hp" value="0" readonly> Code language: HTML, XML (xml)The simple solution is to replace any disabled tags with readonly.
Autocalcs are a perfectly adequate way to do simple things and are much easier to write. So why use sheet workers?
- Sheet workers are much more efficient, like orders of magnitude faster. If your sheet is has thousands of autocalcs, you could see a major speed-up using sheet workers.
- There are things you can do with sheet workers just cannot do with autocalcs (later posts will explore this).
- You can use them for token bar values.
- You can’t use sheet workers on top of autocalcs. This is a frustration, but all stats that form a basis for sheet workers cannot be autocalcs.
That last part is important. You cannot use AutoCalc attributes in a sheet worker, so after you start using sheet workers, you’ll often have to update many of your AutoCalcs to sheet workers. Later posts will show how to do that very quickly, but this post is about the basics.
One nifty thing you can do is add sheet:opened to the event line, creating something like:
on('change:constitution change:size sheet:opened', function() {Code language: JavaScript (javascript)It’s very easy to overdo this, and just add it to every sheet worker. In reality, it’s rarely needed but is very handy when building your sheet. It’s very quick to test changes in calculation.
But generally, you should think carefully if you need this, and if you don’t know why you should use it, it’s better that you don’t.
A fairly common mistake (though pretty minor one) is for people to grab attributes that aren’t needed. Something like this is common:
on('change:constitution change:size change:hp', function() {
  getAttrs(['constitution', 'size', 'hp'], function(values) {Code language: JavaScript (javascript)
This is a sheet worker to calculate HP, but HP is never itself used in the calculation. It is simply the result of a calculation, so it shouldn’t be on the getAttrs line – you will be overwriting whatever the old value is.
on('change:constitution change:size change:hp', function() {
  getAttrs(['constitution', 'size'], function(values) {Code language: JavaScript (javascript)
And it shouldn’t be on the event line, either – remember that is triggered whenever a watched attribute changes. So, changing the hp attribute will cause this sheet worker to run again. It’s possible to accidentally create infinite loops here – so only include the stats that you really need to watch.
on('change:constitution change:size', function() {
  getAttrs(['constitution', 'size'], function(values) {Code language: JavaScript (javascript)