This post focuses on colours, images, and the background of elements. If you do nothing with the background, you get a simple white sheet, and that doesn’t look great. Applying a little colour works wonders, and being able to add images, for things like a logo, is a great feature.
You can assign a colour to many things, like fonts or borders, but here we are focussing on the background. When assigning a colour, use any of the colour values described on this tab.
Note: I’m English, and use the English spelling for colour in conversation. But the CSS property uses the American spelling, color, so when I’m referring to the property I use that spelling.
Named Colours
background-color: red;
background-color: green;
background-color: blue;Code language: CSS (css)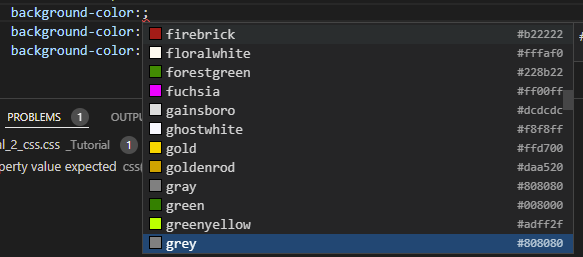
The simplest way to assign a colour is to use a name. CSS has 140 named colours, from obvious ones like red, green, blue, and black, to more obscure ones like ghostwhite, powderblue, and more.
If you are using VS Code as your Code Editor, just type background-color: and it will show you a big list of colours you can scroll through.
In the Castle Falkenstein sheet I am using as an example, I exclusively use named colours to show you don’t usually need to use anything else. You can stop reading here if you like.
Hexadecimal Colours, aka Hex Colours
background-color: #ff0000;
background-color: #008000;
background-color: #0000ff;Code language: CSS (css)
In that picture above, see the codes like #808080? Those are the hex-values of the colours. Hex values are probably the most common way to express colour values on the web.
You don’t need to worry about what the digits actually are – just search for a colour wheel site, pick a colour, and let it tell you the hex value of your colour. That can also help you pick complementary and contrasting colours for your sheet.
Another thing you can do is use a colour picker, like this one. Just upload a picture, and click on it to find the hex value of the image at that point.
RGB Colours
background-color: rgb(255,0,0);
background-color: rgb(0,128,0);
background-color: rgb(0,0,255);Code language: CSS (css)
Any colour can also be expressed as an RGB colour, which is similarly divided into 3 parts, this time separated by a comma, like this: rgb(0, 128, 0). Each part is a number scale from 0 to 255, and again the first part is red component, then green, then blue (hence the name RGB).
There are even more colour units, but those are all you need to know about for now.
You can apply a background to any element – divs, inputs, spans, whatever. Here it’s been applied to several divs.

This has a red background, several divs on top of that with pale gold background, and then temporarily floating above them all a config div set to the same golden colour, but slightly transparent. The arrangement of the divs will be explained later in this series, but here’s how the colours were achieved:
div.sheet {
  background-color: red
}
div.bio {
  background-color: palegoldenrod;
}
div.config {
  background-color: palegoldenrod;
  opacity: 0.9;
}Code language: CSS (css)
The floating config div will be explained in a later post in this series but for now, notice it has an opacity value. You can use that to make colours paler, or as here, to make an element transparent.
Image URL
There are two different ways to include images in a sheet. Whichever method you use, image URLs must be given in full on Roll20, including the https:// at the start.
img element
The img element is already described in the HTML Guide.
background-image
You can assign a background-image to any element – div, heading, input, button, etc. The image address is included in an url(put address here) function.

On the Falkenstein sheet, I have a bunch of images like these. For now, assume they are square divs.
div.clubs {
   height: 25px;
   background-color: #F5F5F5;
   background-image: url(https://i.imgur.com/5HGzHWz.png);
   background-position: center center;
   background-repeat: no-repeat;
   object-fit: contain;
}Code language: CSS (css)
When using background-image, always give the element a size – height or width (or both). The image by default will be shown at its full size and might be too big to fit in the element.

An image is placed at the top right of its element, and is allowed to repeat as many times as it will fit. The clubs suit image here is small enough to tile 1.5 times horizontally.
Use background-repeat: no-repeat when you want just a single item. With repeat-x it’ll tile only in the horizontal direction, and repeat-y tiles only vertically.
Then use background-position to change the placement. The first value is horizontal placement, then vertical. Horizontal values can be left, center, or right, and vertical values can be top, center, or bottom. You can use percentage values instead, with 100% equalling right or bottom.
Fitting Images: background-size or object-fit
Finally, set a property to make the image fit in the element. There are two properties you can use, and they give different results. In my experience, object-fit is the better one to use.
The two most common values are contain and cover. Contain resizes the image to fit completely inside the element, while cover resizes it so only one side fits and the rest is cropped.
The character sheet portrait is using object-fit:cover, while the suit images are using contain. Experiment to find the one that’s right for you.
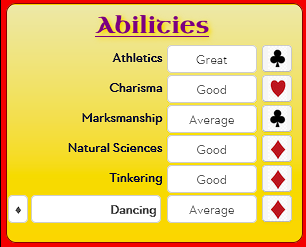
One way to liven up flat colours is to use a gradient. Here is part of the Falkenstein sheet using a subtle gradient.
div.abilities {
     background: linear-gradient(to top, gold 0%, palegoldenrod 100%);
}Code language: CSS (css)
There are a few types of gradients, and designing them is complicated. Luckily you don’t have to know what you’re doing – there are a lot of web pages that can be used to create gradients very easily. I’m partial to CSSGradient.io, but there’s a very simple, easy to use page at css-gradient.com.
One thing to be aware of when using generators: older browsers often had mixed support for gradients, and each had their own code to use them. So you might see code like this:
background: -webkit-gradient(linear, left bottom, left top, color-stop(0, #ffff00), color-stop(1, #e01f8e));
background: -webkit-linear-gradient(bottom, #ffff00 0%, #e01f8e 100%);
background: -moz-linear-gradient(bottom, #ffff00 0%, #e01f8e 100%);
background: -o-linear-gradient(bottom, #ffff00 0%, #e01f8e 100%);
background: -ms-linear-gradient(bottom, #ffff00 0%, #e01f8e 100%);
background: linear-gradient(to top, #ffff00 0%, #e01f8e 100%);Code language: CSS (css)
But you don’t need that for modern browsers (especially the ones Roll20 is compatible with). You only need the last line there, and can discard any values starting with -. So all you need is:
background: linear-gradient(to top, #ffff00 0%, #e01f8e 100%);Code language: CSS (css)The previous tabs demonstrate a lot of properties starting with background- (and there are a lot more). But there’s also a shorthand property, background, that can be used in place of those.
The browser is usually smart enough to figure out which property is which so you can do this:
div.clubs {
   height: 25px;
   background: #F5F5F5 url(https://i.imgur.com/5HGzHWz.png) center center no-repeat;
   object-fit: contain;
}Code language: CSS (css)
You might prefer to use the specific properties, especially while still learning CSS. But if you want to use this shorthand property, you can.
Background can’t include all properties – gradients need their own declaration.
Background Image and Colour
Images often don’t fill the element (especially if using contain), and some images can be partially transparent. The background colour will show through in the places it’s not covered. So there are times background-image won’t be needed, and times it will.
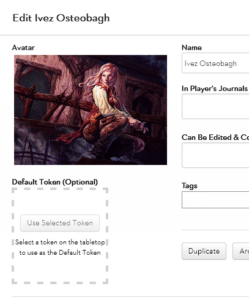
You can set images in the bio tab for the avatar and token, as in the image to the right. A new feature allows you to also show those images on the character sheet itself.
The oval portrait on the Falkenstein character sheet needed this in the HTML:
<img name="attr_character_avatar">Code language: HTML, XML (xml)And then some code in the CSS to style it as an oval image (mainly border-radius: 50%).
It’s that easy. There are two properties:
- name=”attr_character_avatar”
- name=”attr_character_token”
These have to be placed in the HTML, not the CSS. You can add them to an img, or any other element. For instance, if adding the token image to a div, you could use:
<div name="attr_character_token"> </div>Code language: HTML, XML (xml)The element can also include classes or ids as normal. Then add styling properties in the CSS to present it as you want it to be displayed.
Dynamic Images
There is also support for dynamic images, where you might have an input where the player enters an URL, and a div or other element then is updated to display that image.
There are a lot of potential problems with this:
- images might be of many different sizes and aspect ratios, making them hard to appear presentably
- Players have to enter the URL in text – the potential for typos messing things up is high.
You can bypass these issues, by choosing images ahead of time, and letting them be chosen via select dropdown or radio group. (Sheet workers are another possibility – that will be covered later).
Here’s what you need:
- An element that contains the attribute values like the option values of a select, or a text input. Let’s assume that element has name=”attr_sheet_image”. (It can be any valid name.)
- An element set to receive the image, which has the same name=”attr_sheet_image” property. It might be like the div above, just with the new name. This element must have a size.
<select name="attr_image_test">
    <option value="https://i.imgur.com/5HGzHWz.png">Club</option>
    <option value="https://i.imgur.com/j0clYEV.png">Diamond</option>
    <option value="https://i.imgur.com/clhQNKK.png">Spades</option>
    <option value="https://i.imgur.com/d7wRbuh.png">Hearts</option>
</select>
<div class="image-test" name="attr_image_test"> </div>Code language: HTML, XML (xml)
Notice that div has a class. You need to give it at least a height for the image to show up roperly, like say:
.image-test {
  height: 100px;
}Code language: CSS (css)
You can give other properties (like width), but height is not optional.
Properties in this Page
- background-image
- background-color
- background-position
- background-repeat
- background
- object-fill
- opacity
Further Reading: W3Schools pages on colours and the Roll20 Wiki page on images.
