If you want to share a sheet with the community, you need to upload it to the Roll20 Repository on GitHub. GitHub is a service anyone can use to save programming projects, and it is great for collaboration. Roll20 use it for community sharing of Character Sheets and API Scripts.
This page tells you how to upload your sheets to the Roll20 Character Sheet Repository, and assumes you have never used GitHub before.
Setting Up Your Character Sheet Folder
Before you start, you need a folder on your hard drive set up.
For best results, make sure the folder name only uses English language letters, numbers, and underscores. You might not need to do this, but sometimes Roll20 has issues with other characters, so it’s best to be safe.
For example, avoid naming your folder “Dungeons & Dragons”, instead name it something like “Dungeons_and_Dragons”.
Use the same naming scheme for files inside the folder.
You need the following files:
- HTML File: Your sheets HTML in a file. If you used the Custom Sheet Sandbox to create your sheet (and you really should), you’ll have this – otherwise you’ll need to create it. Just copy the text in your HTML tab, paste it into a text file, and save that file with a .html extension.
- CSS file: ditto for your sheet’s CSS.
- Preview Image: a jpg image file to use as your sheet’s preview.
- sheet.json: You need a special file to tell ROLL20 about your game. The creation of that is described below.
- translations.js: If you set up your sheet for multi-language use, you’ll have a transaltions.js file. If you didn’t, you can ignore this.
If your sheet uses any images, it’s a good idea to include copies of the images in your folder, too. You’ll find out why in Sheet Images.
The sheet.json file
Create a file in notepad or your Code Editor called sheet.json, and put text like this inside it:
{
    "html": "your HTML filename.html",
    "css": "your CSS filename.css",
    "authors": "your name",
    "roll20userid": "your roll id",
    "preview": "your preview image filename.jpg",
    "instructions": "any description you want to appear here"
}Code language: JSON / JSON with Comments (json)
Use whatever name you want to be identified by under “authors”. If you want to make it easy for people to contact you with suggestions to update the sheet, consider including an email address here.
You can find your roll20 id from your roll20 profile page URL. Here’s mine (it’s the number after users):

If the sheet has multiple authors, separate their names and ids by commas, inside quotes, like so:
"authors": "GiGs, Bilbo",
"roll20userid": "157788, 623548", Code language: JSON / JSON with Comments (json)
The instructions are what is seen when people are picking a character sheet to play. So for simple sheets, you don’t need to put much there.
Now you are ready to publish your sheet to Github.
Publishing Your First Sheet
Here’s a simple 10-step procedure to get your sheet uploaded to GitHub. It may look like a lot, but each one is extremely simple – usually just taking one or two mouse clicks for each. Just follow the steps one at a time, and you’ll be fine.
- Create a GitHub account
- Download and install GitHub Desktop
- Go to the roll20 repository, and click the Fork button (over on the right near the top), so it copies the repo to your GitHub account
- Once the fork completes, click the Clone or Download button on your fork. A prompt will appear: click Open in Desktop. This will open GitHub Desktop and download the repo to your computer. It might take a while.
- Once it’s finished, it’ll open a page in the Github Desktop. Find and click the Show in Explorer button.
- Now copy your sheet folder to the repo folder on your hard drive. As a reminder: your folder should contain an HTML file, a CSS file, an image file of the character sheet to show as a preview, and a JSON file. You might also have a translations file, but that’s optional.
- Once you have copied the files, navigate back to GitHub Desktop, and it will detect that files have changed. Enter a name and description (this will be displayed to the roll20 GitHub devs, so you just need to let them know it’s a new sheet). Then click the Commit button
- After a few moments on the right side, a blue Publish Branch button will appear. Click that.
- After a few seconds, that button will be replaced by Create Pull Request. Click that.
- This will open a browser page, which contains a green Create Pull Request button. Click that and you’re done.
And that’s it.
Updating Your Sheet and Sharing More Sheets
What Is A Branch?
You can commit (upload) only one sheet to Roll20 at a time. If you want to work on more than one sheet, you need to create separate a separate branch for each sheet.
A branch is a separate version of your repo. It starts out identical to the main copy (the master), but any changes you make while working with a branch are saved only to that branch.
When you make a commit to the Roll20 repo, GitHub Desktop commits the active branch. This means you can have different branches for each sheet you are working on, and be sure that only one sheet at a time is uploaded to Roll20.
Creating and Switching Branches
When you have a repository active in Github Desktop, you can also see the branches:

When you click the current branch dropdown, it shows the existing branches under Recent branches:
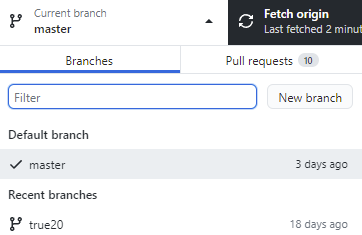
You can create a new branch by typing a name in the filter box and clicking New Branch. You’ll then get a form like this:

Once you click Create Branch, it’ll take a few seconds to create it, and then GitHub Desktop will show this:

Click that Publish Branch button, and your branch will be saved to your online account. At this point, no changes have been made to Roll20’s version of the repo. GitHub desktop will change to this:

Don’t click that yet. That button is used to send your branch to Roll20. Now you can work on your sheet, and switch between branches. When you are ready to share your sheet with the community, make sure its branch is active, and click the Create Pull Request button.
Making a Pull Request
Back when I started making sheets and updates for Roll20, this needed a lot of manual work. But now GitHub Destob handles it all with a single click. Just click that create Pull Request button, enter the information you are prompted for, and bam, that’s it.
You can continue making changes to your sheet. When you’re happy with them, reopen GitHub Desktop, switch to the appropriate branch (if necessary), and GD will detect there are changes and ask you to commit them. Just click that button, and since you already have an active pull request, it’s updated automatically – you don’t have to do anything else.
You can make multiple changes a day, however many you need, and each time you click the Commit button, your pull request will be updated.
Keeping your Repo up to Date
The GitHub Repo is continually being updated. But your clone of that repo doesn’t get updated automatically. Over time it can get out of date, and that creates problems. Your future commits and pull requests might fail.
Luckily, the Pull App fixes that. This is an app you install on your online GitHub account, and it then keeps your Roll20 repo up-to-date.
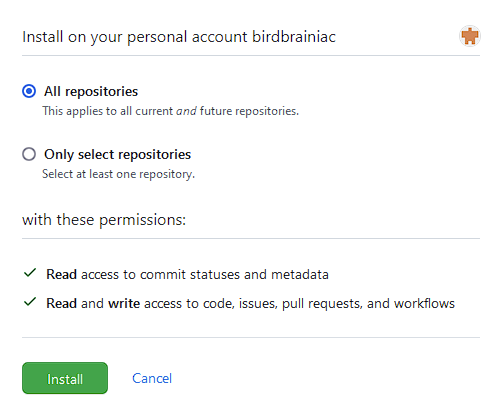
The app is found here. Go there and click the big green Install button.

It’ll then ask you how you want it installed. Just accept the default, and click the green install button.
And that’s it, you can forget you ever needed to install this app.
When Updates Go Wrong
One thing to be aware of when uploading sheets to GitHub is that sometimes you get errors. In my experience, this happens probably more than half the time when submitting a new sheet.


The solution here is simply to do nothing – it’s part of the normal process. Roll20’s GitHub is automated and does not have good error reporting. Just wait a few days, and it’ll be manually processed, and if the submission is correct, it’ll go through with no action from you needed.
There can be other errors – if you are submitting changes to an existing sheet, make sure to follow the guidelines above about creating a separate branch for each commit.
The Roll20 Wiki
There’s an excellent Introduction to GitHub on the Roll20 wiki if you want to learn more about using GitHub.
