- Setting Up The Handlebars Character Sheet Generator
- Basic Templating with Handlebars
- Handlebars Templating: Things Get Complex
- Handlebars Templating: What are Helpers?
- Handlebars Templating: When You Want to Stop Handlebars
- Handlebars Templating: Nesting in All Its Forms
- Handlebars Templating: Handling Generator Errors
- Handlebars Templating: Helpers
- Handlebars Templating: Partials
In default Handlebars, Helpers are a way to include your own code to do whatever you want to do. Want to capitalize all text of a certain type? Create a helper that capitalizes text. Whatever you can do with Javascript, you can do with a Helper.
However, we are using a tool built to simplify Handlebars and run it for us. We can’t create Helpers. Luckily, we can still use Helpers. There is a massive set of Helpers that are installed in the tool that we can use freely, if we know how to. The tool has a link to these Helpers. Click the About button
and scroll down till you find the Helpers heading.
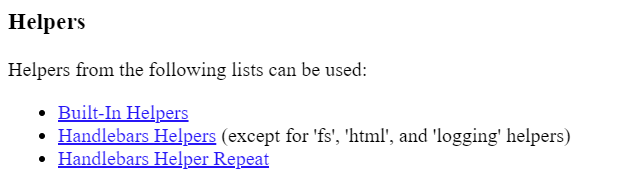
There are three links there to different sets of helpers, with some documentation on using them. There are Helpers for a vast number of things, but if you are anything like me, you’ll find standard Handlebars documentation to be arcane and impenetrable. It’s even worse than the worst of Roll20’s own documentation, and probably written by software engineers who are infamous for being bad at documenting their projects, so this page which will show you how to use Helpers and understand some of that documentation.
The Simplest Helper
Almost everything you use in handlebars is a Helper. You’ve already used the {{each}} block – you’ll find it in Built-in Helpers. You’ve also used {{eq}}, which is under Handlebar Helpers. From these we can surmise the basic formatting rule. Let’s use {{capitalize}} as an illustrative example.
There are several different Helper formats. If you want to capitalise something, do this:
{{capitalize some text}} will give the output Some text.
The first word has been made capital. You can use capitalizeAll if you want to capitalise every word supplied, and things like camelCase allow different transformations.
Where it gets magical: you don’t have to hardcode your words – you can include the output of other Handlebars Helpers, like an each block. For example, lets capitalise all stat names in our previous block:
<div class="stats">
<h4>Stat</h4>
<h4>Score</h4>
<h4>Buff</h4>
<h4>Bonus</h4>
{{#each stats}}
<span>{{capitalize this}}</span>
<input type="number" name="attr_{{this}}" value="10">
<input type="number" name="attr_{{this}}_buff" value="0">
<input type="number" name="attr_{{this}}_modifier" value="0">
{{/each}}
</div>
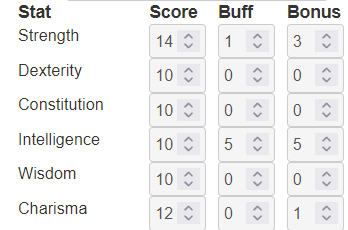
Code language: Handlebars (handlebars)Now we have each stat in the Stats block formatted properly, like this:
We can do the same thing with skills, but the select dropdown presents problems. Here we want the visible text capitalised, but the value of that selection to remain lower case so that the sheet worker’s keep working normally.
<div class="skills">
<h4>Skill</h4>
<h4>Stat</h4>
<h4>Trained</h4>
<h4>Special</h4>
<h4>Total</h4>
{{#each skills as |skill|}}
<span>{{capitalize @key}}</span>
<select name="attr_{{@key}}_skill">
{{#each @root.stats as |stat|}}
<option value="{{this}}" {{#eq skill stat}}selected{{/eq}}>{{capitalize this}}</option>
{{/each}}
</select>
<input type="checkbox" name="attr_{{@key}}_trained" value="1">
<input type="number" name="attr_{{@key}}_special" value="0">
<input type="number" name="attr_{{@key}}_modifier" value="0">
{{/each}}
</div>
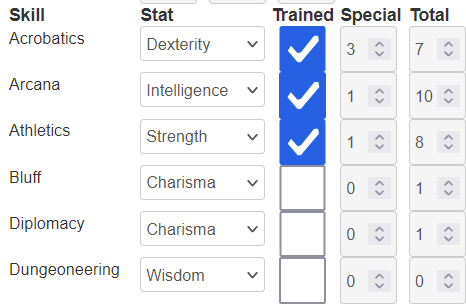
Code language: Handlebars (handlebars)Here we have capitalised the Skill name, and the dropdown entries, while creating a separate option value that is not capitalised. That look like this.
We might want to style various entries to line everything up properly, but that’s more for the CSS section of the guide and is out of the scope of this post.
When To Use The #
Some helpers must start with a hash (#), like {{#each and others don’t ({{capitalize). If the entire Helper is contained in the single {{ }} you don’t need the hash, but if you need a second block {{/ }}, you must use a #. For example, look at {{#each.
{{#each stats}}
    <span>{{capitalize this}}</span>
    <input type="number" name="attr_{{this}}" value="10">
    <input type="number" name="attr_{{this}}_buff" value="0">
    <input type="number" name="attr_{{this}}_modifier" value="0">
{{/each}}Code language: Handlebars (handlebars)
Here, the each helper affects everything with {{#each}} and {{/each}} (the start and end block), but it contains a {{capitalise}} block which is entirely self-contained so doesn’t need any extra symbols.
Documentation normally doesn’t show you whether you need the # or / symbols but it might refer to helpers as a Block Helper – in which case you need the # and /. So remember: if all work occurs within those first {{ }} brackets, you don’t need the symbol. If the work happens after the first {{ }} brackets, you do need # (and you probably need an ending block that starts {{/).
Helpers with an Else Block
Sometimes a Helper has what’s called an Inverse Block. The helper contains some kind of expression or logical test, and when truthy, it shows the first result and when falsy it shows the second.
Lets take a second look at the eq helper.
    <select name="attr_{{@key}}_skill">
        {{#each @root.stats as |stat|}}
        <option value="{{this}}" {{#eq skill stat}}selected{{/eq}}>{{capitalize this}}</option>
        {{/each}}
    </select>Code language: Handlebars (handlebars)
Here it’s used in the select dropdown, which generates a dropdown list of the 6 attributes, and when the skill is the same as the stat it adds the text selected. This is the key section:
{{#eq skill stat}}selected{{/eq}}Code language: Handlebars (handlebars)We can add an inverse block using the else keyword, which could look like this.
{{#eq skill stat}}selected{{else}}disabled{{/eq}}Code language: Handlebars (handlebars)Here a comparison of skill is made against stat. Wen they are equal, that item is selected, but when they are not equal, that item is disabled.
The effect of this would mean that one item in each dropdown is selected, and all other items are disabled. So it has the appearance of a dropdown – players can see all six attributes, but one is always selected and it cannot be changed. No other stat can be selected – they are all disabled.
This is not useful code, but does illustrate how an else block works!
A note about Truthy and Falsy
Javascript also uses the concept of truthy and falsy. Basically if the item matches with the precision expected, it’s truthy, and otherwise, it’s falsy. There’s more to it than this – it’s a useful concept, but in most cases, it matches exactly what you expect: if something is true, it’s truthy, and if its not true, its falsy.
A Complication
When a helper is being applied to a parameter that is not easily seen as a single variable, enclose in quotes. For example, if you were trying {{capitalize the first word starts with upper case}}, you’d hit a problem. When you have a helper in this form, it has a number of “words” or parameters, and capitalise works on only one.
In this kind of situation, put everything inside quotes, so this will work. {{capitalize "the first word starts with upper case"}}. The quotes make Handlebars see this as one entity, and it will then apply capitalize on that one entity.
You can use quotes to combine things and make Handlebars treat them as a single entity. You don’t need to do this with variables like {{this}}, but you generally shouldn’t nest double brackets inside double brackets. We’ll see how to handle that kind of situation in the next post.
Summary
There are many possible Helpers, too many to describe individually. This article shows you how to use them. Things we have covered:
- How To Find Helpers
- When to use
#(basically whenever you need a{{/ending block). - What is an Inverse Block?
- How to use quotes to group things into a single item.
