- Setting Up The Handlebars Character Sheet Generator
- Basic Templating with Handlebars
- Handlebars Templating: Things Get Complex
- Handlebars Templating: What are Helpers?
- Handlebars Templating: When You Want to Stop Handlebars
- Handlebars Templating: Nesting in All Its Forms
- Handlebars Templating: Handling Generator Errors
- Handlebars Templating: Helpers
- Handlebars Templating: Partials
In this post, we’ll be doing some very complex things, so make sure you are familiar with the basics of sheet authoring, and the last couple of posts in this series on Templating with Handlebars.
In the last post, we looked at the each block. That is the foundation of handlebars, so we’ll be doing more ways it can be used today.
A Basic Skills List
In the last post, we build a stat list. Now we want to add a Skill List but that’s a bit more complex. We’ll work through this several times. Our first run will end up with this:
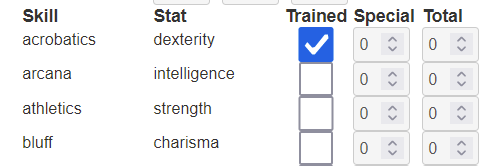
We have a lot more skills than those shown, but this pic illustrates a few things:
- Each skill must have its name listed (we’ll see how to capitalise it later)
- Each skill has an assigned stat, and that varies.
- For each skill, we need to know how much the character is trained it. (For some games this might just be a numeric level, but here we have assumed a checkbox showing whether you are trained or not).
- Then we have a Special column, which allows to enter any miscellaneous bonus or penalty.
- Finally, a Total column will show the total of stat bonus, training bonus, and special modifier, resolving to a final Total.
We’ll need a HTML section, laying out the attributes, then a bunch of sheet workers, one per attribute, to calculate the total modifier.
Updating the JSON Files
We need to add the skills to the JSON file. An Array is only good for storing one piece of information, like the skill name. But here, with each skill, there is also the relevant stat. The obvious solution here is an Object. For example:
{
    "stats": ["strength", "dexterity", "constitution", "intelligence", "wisdom", "charisma"],
    "skills": {
        "acrobatics": "dexterity",
        "arcana": "intelligence",
        "athletics": "strength",
        "bluff": "charisma",
        "diplomacy": "charisma",
        "dungeoneering": "wisdom",
        "endurance": "constitution",
        "heal": "wisdom",
        "history": "intelligence",
        "insight": "wisdom",
        "intimidate": "charisma",
        "nature": "wisdom",
        "perception": "wisdom",
        "religion": "intelligence",
        "stealth": "dexterity",
        "streetwise": "charisma",
        "thievery": "dexterity"
    }
}Code language: JSON / JSON with Comments (json)
Notice at the start with we still have the stats. But it’s now followed by a skills object. Each key in the skills object is the skill name, and each value is the name of the stat used by that skill.
An advantage of arrays and objects here is we can change the particulars of each list – add a stat or skill, change their order, etc – then click the Generate button to regenerate the html file. Making changes is often that simple.
Laying Out The HTML
Notice there are 17 skills. If creating HTML, we’d have to create 5 columns, and 17 rows. We’d need to do something like this, 17 times:
    <span>acrobatics</span>
    <span>dexterity</span>
    <input type="checkbox" name="attr_acrobatics_trained" value="1">
    <input type="number" name="attr_acrobatics_special" value="0">
    <input type="number" name="attr_acrobatics_modifier" value="0">Code language: HTML, XML (xml)
We’d have to change all the attribute names, and it could get very tedious. With handlebars templating, it’s very simple. We just need this code:
<div class="skills">
    <h4>Skill</h4>
    <h4>Stat</h4>
    <h4>Trained</h4>
    <h4>Special</h4>
    <h4>Total</h4>
    {{#each skills}}
    <span>{{@key}}</span>
    <span>{{this}}</span>
    <input type="checkbox" name="attr_{{@key}}_trained" value="1">
    <input type="number" name="attr_{{@key}}_special" value="0">
    <input type="number" name="attr_{{@key}}_modifier" value="0">
    {{/each}}
</div>
Code language: Handlebars (handlebars)
We have used {{#each skills}} to find the skill, and iterate through it. But there’s a difference here. When using an Object, {{@key}} is used to get the name of the key and {{this}} refers to its value (in this case the stat).
They are used basically the same way – each iteration gives one {{@key}} and one {{this}}. This block of code generates all the code for all 17 skills. Click the generate button and the HTML file is regenerated.
A Quick Note about {{this}}, {{@key}} and {{@index}}
You can use all of these items with both arrays and objects.
{{this}} gives you the value of each iteration. For arrays, that is the listed item at that iteration, while with objects, it is also the value – but that can contain several things. Recall that arrays are things like [1,2,3] – each value is separated by a comma. While Objects are like this {first: 1, Second: 2, third: 3} – these have an obvious key (first, second, third) and a value after the colon: 1, 2, 3.
{{@key}} always gives the name of the key at that iteration. With objects that is easy to see (first, second, third), but with arrays, the key is the numerical order starting from 0. So with 3 items, they’ll be 0, 1, and 2. It’s just not usually useful to get the keys of arrays.
Finally {{@index}} is something we haven’t discussed yet. It is the numerical order of the item, starting at 0. If you are on the first iteration, it is 0; on the second it is 1, etc. For arrays, the key and index are the same. For objects, they aren’t. It’s sometimes handy to use the index.
Picking From a List
But this can be more complicated. Let’s say people can choose whichever stat applies with each skill, but each skill has a preferred attribute. For that we need to add a dropdown list. So the HTML for each attribute would look like this:
    <span>acrobatics</span>
    <select name="attr_skill_stat">
        <option>strength</option>
        <option selected>dexterity</option>
        <option>constitution</option>
        <option>intelligence</option>
        <option>wisdom</option>
        <option>charisma</option>
    </select>
    <input type="checkbox" name="attr_acrobatics_trained" value="1">
    <input type="number" name="attr_acrobatics_special" value="0">
    <input type="number" name="attr_acrobatics_modifier" value="0">    Code language: HTML, XML (xml)
Here we have to iterate through the stats within the skills section, and also check each stat to see if it matches the stat for that skill to get the selected attribute. A newbie to handlebars could spend way too long figuring out how to do this (don’t ask me how I know this). But it can be done pretty simply with two new techniques.
The first step is to jump outside of the current skills loop, and generate a different stats loop. We can do this with the @root keyword, like this:
{{#each skills}}
<span>{{@key}}</span>
<select name="attr_{{@key}}_skill">
{{#each @root.stats}}
<option>{{this}}</option>
{{/each}}
</select>
<input type="checkbox" name="attr_{{@key}}_trained" value="1">
<input type="number" name="attr_{{@key}}_special" value="0">
<input type="number" name="attr_{{@key}}_modifier" value="0">
{{/each}}
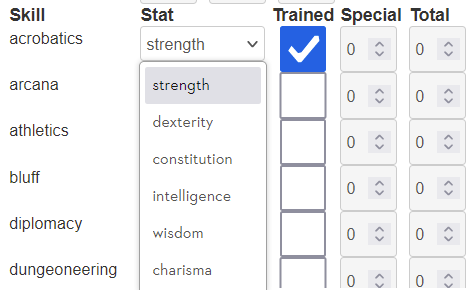
Code language: Handlebars (handlebars)Here we have one each loop for skills, and inside it another loop for stats. Notice how the stats loop is called. That gives us a dropdown for each stat:
Now we need to make sure the correct stat for each skill is eassigned. We can do this with a new comparison command: with. But there is a problem – we want to use the {{this}} keyword two different ways (once to identify which is the current skill, and again to identify the current stat). Luckily, we can declare a temporary name for each item, using the as keyword.
    {{#each skills as |skill|}}
    <span>{{@key}}</span>
    <select name="attr_{{@key}}_skill">
        {{#each @root.stats as |stat|}}
        <option {{#eq skill stat}}selected{{/eq}}>{{this}}</option>
        {{/each}}
    </select>
    <input type="checkbox" name="attr_{{@key}}_trained" value="1">
    <input type="number" name="attr_{{@key}}_special" value="0">
    <input type="number" name="attr_{{@key}}_modifier" value="0">
    {{/each}}

Code language: Handlebars (handlebars)
We are getting a little bit ahead of ourselves here, as we used the EQ helper. Helpers are ways of including specialised code within a handlebars block.
The eq helper checks to see if one thing equals another. Here we are comparing the value of skill against the value of stat – remember this is a loop inside another loop, and we are comparing the current iterations of each loop. So, when the skill is arcana it looks at that skills value which is intelligence; then when looping through the skills, when the stat is equal to intelligence, equality is true, and so that code between the {{#eq}} and {{/eq}} blocks is run. That is simply entering the text selected. So we end up with this:
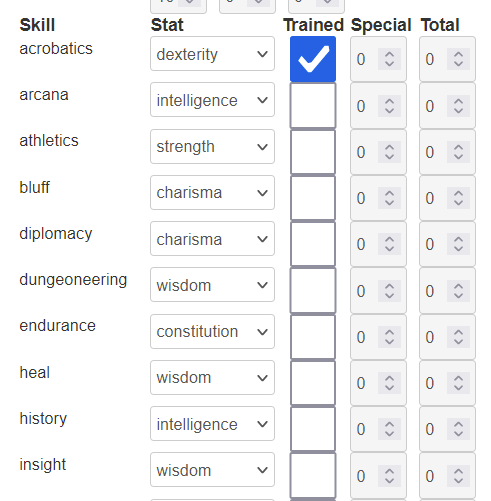
Now we have a very short routine that generates the complete skills, and displays which attribute is currently selected. Now we need to caclulate that total column. For that we need sheet workers.
The Skills Sheet Workers
We’ll show how to create the sheet workers in two steps. It’s more complicated than it appears. First we have the Special stat, which can be a number. That’s easy. Then we have the Trained bonus, which is a fixed bonus if and only if is checked. Finally, we need to include all siz stats, and pick the value of one that is currently selected. Then add all of them together.
We’ll start with the Special and Trained items. The code for that looks like this:
    {{#each skills as |skill|}}
    on('change:{{@key}}_trained change:{{@key}}_special sheet:opened', () => {
        getAttrs(['{{@key}}_trained', '{{@key}}_special'], values => {
            const score = +values.{{@key}}_trained || 0;
            const score_trained = score * 4;
            const special = +values.{{@key}}_special || 0;
            const total = score_trained + special;
            setAttrs({
                {{@key}}_modifier: total
            });
        });
    });
    {{/each}}Code language: Handlebars (handlebars)
It’s the key of the skills object we need – the name of the skill. Then we use a simple multiplier to get the Trained value. Recall that the checkbox has a value of 1 when checked, and 0 when not, so by just multiplying by the skill bonus for being trained, we get the correct number. In this example, we have assumed you get a +4 bonus for being Trained. Possibly too high for a real game, but this is just an example.
This code now generates a sheet worker for each skill, to add the bonus for being Trained to the Special Bonus. Now we need to figure out how to add the stat. This is where things get really hairy. Tery to follow along.
Also, there’s more than one way to do this, so the method presented here is just one possible way. If you prefer another, by all means use it.
First, we use a Handlebars each block to create an array of stats, with _modifier in the name. Then we use a javascript function to create a change: string.
    const stats_modifier = [{{#each stats}}'{{this}}_modifier',{{/each}}];
    const changes = arr => arr.reduce((all, one) => `${all} change:${one}`,''); Code language: Handlebars (handlebars)
We will need an array of the stats later, with _modified after the name, so we can grab the stat value from the character sheet. But we also need a changes string of those atats, so when the stat values changes the skills are updated. (You’ll find a better version of this function at the Function Library under the name build_changes. It’s a useful function!)
Here’s the complete skill block, and the skill bits are described below.
    const stats_modifier = [{{#each stats}}'{{this}}_modifier',{{/each}}];
    const changes = arr => arr.reduce((all, one) => `${all} change:${one}`,'');

    {{#each skills as |skill|}}
    on(`change:{{@key}}_trained change:{{@key}}_special change:{{@key}}_skill ${changes(stats_modifier)} sheet:opened`, () => {
        getAttrs(['{{@key}}_trained', '{{@key}}_special', '{{@key}}_skill', ...stats_modifier], values => {
            const score = +values.{{@key}}_trained || 0;
            const score_mod = score ? 4 : 0;
            const special = +values.{{@key}}_special || 0;
            const skill = values['{{@key}}_skill'];
            const skill_bonus = +values[`${skill}_modifier`] || 0;
            const total = score_mod + special + skill_bonus;
            setAttrs({
                {{@key}}_modifier: total
            });
        });
    });
    {{/each}}Code language: Handlebars (handlebars)
Notice how the event line (starting with on), and the following getAttrs line include the new properties. Then we have these two lines:
            const skill = values['{{@key}}_skill'];
            const skill_bonus = +values[`${skill}_modifier`] || 0;Code language: Handlebars (handlebars)
The first line gets name of the currently selected skill, like strength, dexterity, etc. The following skill_bonus line uses that skill name, with _modifier appended, and grabs the value of that stat. This is a technique that is handy to know, and isn’t a handlebars technique – it’s a roll20 sheet worker technique. First grab the current selection in a select dropdown, and use that to get the value of whatever is selected.
Now, there’s another important way to do this that is more efficient – where some or all of the sheet worker code presented is incorporated in a single sheet worker. It’s honestly not too hard to do this, and there are some efficiency improvements – but honestly, you are unlikely to see them unless your sheet is very, very heavy. We may look at how to do that one day, but it’s not specific to handlebars.
So here’s the code for the complete sheet so far:
<div class="bio">
    <span>Name</span>
    <input type="text" name="attr_character" value="">
</div>
<div class="stats">
    <h4>Stat</h4>
    <h4>Score</h4>
    <h4>Buff</h4>
    <h4>Bonus</h4>
    {{#each stats}}
    <span>{{this}}</span>
    <input type="number" name="attr_{{this}}" value="10">
    <input type="number" name="attr_{{this}}_buff" value="0">
    <input type="number" name="attr_{{this}}_modifier" value="0">
    {{/each}}
</div>
<div class="skills">
    <h4>Skill</h4>
    <h4>Stat</h4>
    <h4>Trained</h4>
    <h4>Special</h4>
    <h4>Total</h4>
    {{#each skills as |skill|}}
    <span>{{@key}}</span>
    <select name="attr_{{@key}}_skill">
        {{#each @root.stats as |stat|}}
        <option {{#eq skill stat}}selected{{/eq}}>{{this}}</option>
        {{/each}}
    </select>
    <input type="checkbox" name="attr_{{@key}}_trained" value="1">
    <input type="number" name="attr_{{@key}}_special" value="0">
    <input type="number" name="attr_{{@key}}_modifier" value="0">
    {{/each}}
</div>
<script type="text/worker">

    {{#each stats}}
    on('change:{{this}} change:{{this}}_buff', () => {
        getAttrs(['{{this}}', '{{this}}_buff'], values => {
            const score = +values.{{this}} || 0;
            const buff = +values.{{this}}_buff || 0;
            const base_mod = Math.floor(score/2) -5;
            const total = base_mod + buff;
            setAttrs({
                {{this}}_modifier: total
            });
        });
    });
    {{/each}}

    const stats_modifier = [{{#each stats}}'{{this}}_modifier',{{/each}}];
    const changes = arr => arr.reduce((all, one) => `${all} change:${one}`,'');

    {{#each skills}}
    on(`change:{{@key}}_trained change:{{@key}}_special change:{{@key}}_skill ${changes(stats_modifier)} sheet:opened`, () => {
        getAttrs(['{{@key}}_trained', '{{@key}}_special', '{{@key}}_skill', ...stats_modifier], values => {
            const score = +values.{{@key}}_trained || 0;
            const score_trained = score * 4;
            const special = +values.{{@key}}_special || 0;
            const skill = values['{{@key}}_skill'];
            const skill_bonus = +values[`${skill}_modifier`] || 0;
            const total = score_trained + special + skill_bonus;
            setAttrs({
                {{@key}}_modifier: total
            });
        });
    });
    {{/each}}
</script>Code language: Handlebars (handlebars)
It is much, much shorter and easier to write (if you are in the know) than the version without sheet templating (which is over 500 lines of code!).
The Story So Far
We have so far used an {{each}} block to create loops, the {{this}}, {{@key}} and {{@index}} properties to get the current values of a loop, and the {{eq}} helper. Everything else has been standard HTML and JS.
We also saw how to use variable names instead of using {{this}}. by using as (e.g., {{#each skills as |skill| }}, and used @root to get values directly while within an each loop.
We have massively cut down the work needed to create duplicated code, and we are just beginning. Things are about to get even more complicated.
