- Setting Up The Handlebars Character Sheet Generator
- Basic Templating with Handlebars
- Handlebars Templating: Things Get Complex
- Handlebars Templating: What are Helpers?
- Handlebars Templating: When You Want to Stop Handlebars
- Handlebars Templating: Nesting in All Its Forms
- Handlebars Templating: Handling Generator Errors
- Handlebars Templating: Helpers
- Handlebars Templating: Partials
Things are going to get pretty complicated in this article, so prepare yourself. This is also the longest article in this series. The table of contents lets you keep track of your progress.
Table of Contents
Racial Stat Bonus
Let’s assume we have a system where the chosen race modifies stats. This will require several things:
- We need to create what the race properties are, and add them to the data file.
- A new dropdown where you select race
- A column in the stats list for racial stat modifier
- A data object in the script block to hold racial properties. The last two steps both use this, so we should calculate it now.
- A sheet worker that responds to race changes, and enters the proper stat bonuses.
- Finally, an update to the stats total calculations, that takes the new racial stats column into account
Each step above can be done manually, without handlebars, but handlebars makes it much quicker. We’ll try to look at methods without and with handlebars.
Creating The Data
This is the only manual part of the process. Lets add the race properties to the bottom of the data file.
{
    "stats": ["strength", "dexterity", "constitution", "intelligence", "wisdom", "charisma"],
    "skills": {
        "acrobatics": "dexterity",
        "arcana": "intelligence",
        "athletics": "strength",
        "bluff": "charisma",
        "diplomacy": "charisma",
        "dungeoneering": "wisdom",
        "endurance": "constitution",
        "heal": "wisdom",
        "history": "intelligence",
        "insight": "wisdom",
        "intimidate": "charisma",
        "nature": "wisdom",
        "perception": "wisdom",
        "religion": "intelligence",
        "stealth": "dexterity",
        "streetwise": "charisma",
        "thievery": "dexterity"
    },
    "races": {
        "human": {
            "strength": "0", "dexterity": "0", "constitution": "0",
            "intelligence": "2", "wisdom": "0", "charisma": "0",
            "description": "Human-looking"
        },
        "elf": {
            "strength": "0", "dexterity": "2", "constitution": "0",
            "intelligence": "0", "wisdom": "0", "charisma": "2",
            "description": "Tall, slim, and pretty"
        },
        "dwarf": {
            "strength": "0", "dexterity": "0", "constitution": "2",
            "intelligence": "0", "wisdom": "2", "charisma": "0",
            "description": "Short and stocky"
        },
        "half-orc": {
            "strength": "2", "dexterity": "0", "constitution": "2",
            "intelligence": "-2", "wisdom": "0", "charisma": "2",
            "description": "Brutish and ugly"
        }
    }
}Code language: Handlebars (handlebars)
It could be formatted more tersely than this, but I want the data to be as easily read as possible. Notice races is an object with the four races, and each has modifiers for the six statistics and an extra description stat. It would be easy to change the attribute values, or to add extra stats and even races. They’d only have to be changed once, and in this one place, and if you are using Handlebars, just click the generate button and the html file is instantly updated.
Now let’s see how we build the rest.
The Dropdown for Selecting Race
For the select dropdown, we need something like this:
    <select name="attr_race">
        <option selected diabled>Choose</option>
        <option value="human">Human</option>
        <option value="elf">Elf</option>
        <option value="dwarf">Dwarf</option>
        <option value="half-orc">Half-orc</option>
    </select>Code language: HTML, XML (xml)
If we are creating that manually, we’d type that in. That first option means that by default the list shows the text Choose, but users cannot select that option – they must choose one of the races.
We have made the values all lower case for each with sheet workers later.
Now, with handlebars, we can create this automatically, like this:
    <select name="attr_race">
        <option selected disabled>Choose</option>
        {{#each races}}
        <option value="{{@key}}">{{capitalize @key}}</option>
        {{/each}}
    </select>Code language: Handlebars (handlebars)
This might not look all that much simpler, but that’s because there are only 4 races. If we later expanded the number of races to, say, 10 or 20, this block would need no changes and would still work.
A Column For Racial Stats
In an earlier post, we described creating a stats section with columns for Name, Score, Buff, and Bonus. We want to add two new columns – one showing the race bonus, and another shpowing the stat total with that added. Something like this:
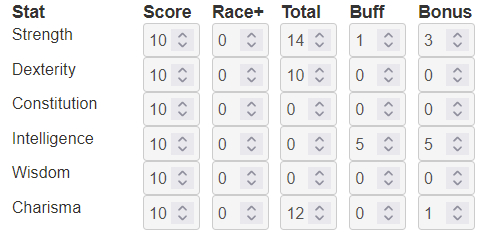
Don’t worry about the values at this point.
If we were to create that manually, it would be something like this:
<div class="stats">
    <h4>Stat</h4>
    <h4>Score</h4>
    <h4>Race+</h4>
    <h4>Total</h4>
    <h4>Buff</h4>
    <h4>Bonus</h4>
    <span>Strength</span>
    <input type="number" name="attr_strength_base" value="10">
    <input type="number" name="attr_strength_race" value="0">
    <input type="number" name="attr_strength" value="0">
    <input type="number" name="attr_strength_buff" value="0">
    <input type="number" name="attr_strength_modifier" value="0">
    <span>Dexterity</span>
    <input type="number" name="attr_dexterity_base" value="10">
    <input type="number" name="attr_dexterity_race" value="0">
    <input type="number" name="attr_dexterity" value="0">
    <input type="number" name="attr_dexterity_buff" value="0">
    <input type="number" name="attr_dexterity_modifier" value="0">
    <!-- other 4 stats -->
</div>Code language: HTML, XML (xml)
Thats just for two stats, we’d need to add four more stats. And if we changed stat names or number if stats, we’d have to create them manually. But with handlebars, we create this and all stats are created automatically:
<div class="stats">
    <h4>Stat</h4>
    <h4>Score</h4>
    <h4>Race+</h4>
    <h4>Total</h4>
    <h4>Buff</h4>
    <h4>Bonus</h4>
    {{#each stats}}
    <span>{{capitalize this}}</span>
    <input type="number" name="attr_{{this}}_base" value="10">
    <input type="number" name="attr_{{this}}_race" value="0">
    <input type="number" name="attr_{{this}}" value="10">
    <input type="number" name="attr_{{this}}_buff" value="0">
    <input type="number" name="attr_{{this}}_modifier" value="0">
    {{/each}}
</div>Code language: Handlebars (handlebars)
Getting Extra
We could take this further, and have an object for columns. The data file would be amended like this:
    "stats": ["strength", "dexterity", "constitution", "intelligence", "wisdom", "charisma"],
    "stat_columns": {
        "Stat": {},
        "Score": {"name": "_base", "base": 10},
        "Race+": {"name": "_race", "base": 0},
        "Total": {"name": "", "base": 10},
        "Buff": {"name": "_buff", "base": 0},
        "Bonus": {"name": "_modifier", "base": 0}
    },Code language: JSON / JSON with Comments (json)
We need a column title, an attribute name, a base attribute, and the readonly attribute, all of which depend on which column we are in.
Now we need to new version of the Handlebars template, and it will include a few special techniques.
<div class="stats">
    {{#each stat_columns}}
    <h4>{{@key}}</h4>
    {{/each}}
    {{#each stats as |stat|}}
    <span>{{capitalize this}}</span>
    {{~#each @root.stat_columns as |col|}}
    {{#unless @first}}<input type="number" name="attr_{{stat}}{{col.name}}" value="{{col.base}}" {{col.readonly}}>{{/unless}}
    {{/each~}}

    {{/each}}
</div>Code language: Handlebars (handlebars)
The first each block loops through the headings of each column and places them appropriately.
The second each block loops through the 6 attributes. But within that loop, we also need to loop through each column. So we give the stat selection an alias (as stat), and use the {{@root}} technique to grab another entry from the another item from the data file, and give that an alias (as col).
Now we can loop through those columns, but the first column has nothing to add (it’s just the label), so there are at least two ways to manage this. The first method:
{{#if @first}}{{else}}<input type="number" name="attr_{{stat}}{{col.name}}" value="{{col.base}}">{{/if}}Code language: Handlebars (handlebars)Use the #if helper to see if it’s the first column, and if so do nothing. If it’s not the first column, skip to the else block, which is where the data for that column is.
if is a helper that tests if something is true, and accepts only one parameter. Here we give it @first, which is a special property of arrays and objects. You can use @first and @last.
There’s another helper like #if called #unless. We use that here because we want to skip straight to if’s inverse.
With that one line, we create all five inputs.
We also use ~ in two places to get rid of white space. Without them, there’d be extra empty lines.
And that’s it. It’s more complicated than the earlier version, so we don’t need to do it this way, but if there’s a chance we’ll be adding more columns later, this is a quick way of managing them. We just need to add some four bits of data (the column header, attribute name, attribute base, and whether it’s readonly) to the data file, and handlebars will manage the columns for us.
This is more complicated, though, so could be easily skipped – that’s why it’s in a Getting Extra section.
Calculating The Javascript Data Object
In the script block, we need to create a data object to hold the race stats. It already exists in the data file, so we need to extract it from there. There’s more than one way to do this, and we’ll show more than one method. We want to end up with something like this (maybe formatted differently).
const "races" = {
        "human": {
            "strength": "0", "dexterity": "0", "constitution": "0",
            "intelligence": "2", "wisdom": "0", "charisma": "0",
            "description": "Human-looking"
        },
        "elf": {
            "strength": "0", "dexterity": "2", "constitution": "0",
            "intelligence": "0", "wisdom": "0", "charisma": "2",
            "description": "Tall, slim, and pretty"
        },
        "dwarf": {
            "strength": "0", "dexterity": "0", "constitution": "2",
            "intelligence": "0", "wisdom": "2", "charisma": "0",
            "description": "Short and stocky"
        },
        "half-orc": {
            "strength": "2", "dexterity": "0", "constitution": "2",
            "intelligence": "-2", "wisdom": "0", "charisma": "2",
            "description": "Brutish and ugly"
        }
    }Code language: JavaScript (javascript)
This is exactly the races object from the data file. For the stats section, we only need the six stats. We might use description elsewhere, but we don’t need it right now.
The Laborious Method
So, the first method would be to take advantage of the fact that we know the stat names: strength, dexterity, etc. This is easiest, but also most laborious because we have to remember what all the stats are named and enter them manually.
    const races = {
        {{#each races}}
        {{@key}}: { strength: {{this.strength}}, dexterity: {{this.dexterity}}, constitution: {{this.constitution}},
            intelligence: {{this.intelligence}}, wisdom: {{this.wisdom}}, charisma: {{this.charisma}} },
        {{/each}}
    };Code language: Handlebars (handlebars)
This gives us the block we want:
const races = [
        human: { strength: 0, dexterity: 0, constitution: 0,
            intelligence: 2, wisdom: 0, charisma: 0 },
        elf: { strength: 0, dexterity: 2, constitution: 0,
            intelligence: 0, wisdom: 0, charisma: 2 },
        dwarf: { strength: 0, dexterity: 0, constitution: 2,
            intelligence: 0, wisdom: 2, charisma: 0 },
        half-orc: { strength: 2, dexterity: 0, constitution: 2,
            intelligence: -2, wisdom: 0, charisma: 2 },
    ];Code language: JavaScript (javascript)
It would be easy to grab description as well, and any other entries we have created – we just have to know what they are.
Walk Through The Object
A more reliable way to build the object is to use an each or similar looping function to walk through every property in the object and build the function entirely programmatically. We don’t need to know what it actually contains – the template will build it for us.
Since there are many ways of doing this in handlebars, we’ll look at several.
    /* METHOD 1 */
    const races = [
    {{#each races}}
    "{{@key}}": { {{#forOwn this}}{{@key}}:"{{this}}", {{/forOwn}} },
    {{/each}}
    ];

    /* METHOD 2 */
    const races = [
    {{#each races}}
    "{{@key}}": { {{#forIn this}}{{@key}}:"{{this}}", {{/forIn}} },
    {{/each}}
    ];

    /* METHOD 3 */
    const races_40 = [
    {{#each races}}
    "{{@key}}": { {{#each this}}{{@key}}:"{{this}}",{{/each}} },
    {{/each}}
    ];

    /* METHOD 4 */
    const races_4 = [
    {{#each races}}
    "{{@key}}": { {{#each .}}{{@key}}:"{{.}}", {{/each}} },
    {{/each}}
    ];Code language: Handlebars (handlebars)
In all of these methods, first we start looping through races, get its @key to display and the value is Method 4 uses {{.}} as a demonstration: you can always type a period in place of this. It’s a shortcut, since we use this so often.{{this}}. This is an object containing all the stat names and any other racial properties.
The { } is typed to create a new object, and a new loop runs inside it – with either forIn, forOwn, or the trusty each Helper.
Method 4 uses {{.}} as a demonstration: you can always type a period in place of this. It’s a shortcut, since we use this so often.
Trailing Commas
All of these examples produce the sdame output. The data object will look like this:
const races_4 = [
    "human": { strength:"0", dexterity:"0", constitution:"0", intelligence:"2", wisdom:"0", charisma:"0", description:"Human-looking",  },
    "elf": { strength:"0", dexterity:"2", constitution:"0", intelligence:"0", wisdom:"0", charisma:"2", description:"Tall, slim, and pretty",  },
    "dwarf": { strength:"0", dexterity:"0", constitution:"2", intelligence:"0", wisdom:"2", charisma:"0", description:"Short and stocky",  },
    "half-orc": { strength:"2", dexterity:"0", constitution:"2", intelligence:"-2", wisdom:"0", charisma:"2", description:"Brutish and ugly",  },
    ];Code language: JavaScript (javascript)
Here it is again, formatted for easier reading:
const races_4 = [
    "human":
        { strength:"0", dexterity:"0", constitution:"0", intelligence:"2",
       wisdom:"0", charisma:"0", description:"Human-looking",  },
    "elf": { strength:"0", dexterity:"2", constitution:"0", intelligence:"0",
       wisdom:"0", charisma:"2", description:"Tall, slim, and pretty",  },
    "dwarf": { strength:"0", dexterity:"0", constitution:"2", intelligence:"0",
       wisdom:"2", charisma:"0", description:"Short and stocky",  },
    "half-orc": { strength:"2", dexterity:"0", constitution:"2", intelligence:"-2",
       wisdom:"0", charisma:"2", description:"Brutish and ugly",  },
    ];Code language: JavaScript (javascript)
Notice the trailing commas at the end. JavaScript will happily ignore them, but if you want to get rid of them for neatness you can.
There’s a block helper called #unless, which runs when somethig is not true. So you can check if something is the last item in a loop, and only print that comma if it is not true. Like this:
    /* METHOD 3 */
    const races_40 = [
    {{#each races}}
    "{{@key}}": { {{#each this}}{{@key}}:"{{this}}"{{#unless @last~}},
     {{~/unless}}{{/each}} }{{#unless @last}},{{/unless}}
    {{/each}}
    ];Code language: Handlebars (handlebars)
This uses @last to check if an iteration of a loop is the last item, and also uses ~ to create some white space (and extra line break) for easier reading.
You don’t have to eliminate trailing commas, but it’s nice to have the option.
A Stringify Method
A fundament fact to appreciate: a handlebars function creates text which is then inserted in the html file. When that html file is run, the text you have created might have to be valid HTML or JavaScript, but before the HTML file runs, it is just text.
This is why we can do things like <input type="checkbox" name="attr_{{@key}}_trained" value="1"> or const score = +values.{{@key}}_trained || 0;
These start out as handlebars commands thanks to the {{@key}} part. They are not HTML or Javascript. Then when the HTML file is created, the {{@key}} part will be replaced with text, and only when the file is loaded into the custom sheet sandbox (running the html file) does it become actual HTML or JS.
So you have to be careful that what is generated will be valid code when run, but you don’t have to worry about what it generates until then. You can mess around and experiment, just as you would with normal typing.
But one side-effect is this: everything in the data file can be treated as just text, and we can extract it as text using stringify helpers. A stringify helper turns what looks like code into a text, a string of symbols. This method is much simpler than any of the above methods, but you have to know it exists.
const races = {{{JSONstringify races}}};Code language: Handlebars (handlebars)Notice the triple-stache around this operation. JSONstringify is a useful helper that grabs the exact text listed in the data file at that point (here, the races object). But it looks very, very ugly without that triple-stach:
const races = {"human":{"strength":"0","dexterity":"0","constitution":"0","intelligence":"2","wisdom":"0","charisma":"0","description":"Human-looking"},"elf":{"strength":"0","dexterity":"2","constitution":"0","intelligence":"0","wisdom":"0","charisma":"2","description":"Tall, slim, and pretty"},"dwarf":{"strength":"0","dexterity":"0","constitution":"2","intelligence":"0","wisdom":"2","charisma":"0","description":"Short and stocky"},"half-orc":{"strength":"2","dexterity":"0","constitution":"2","intelligence":"-2","wisdom":"0","charisma":"2","description":"Brutish and ugly"}};
I said it was ugly! (Also, unusable). But with the triple-stache, it becomes a lot more presentable – and usable!
const races = {"human":{"strength":"0","dexterity":"0","constitution":"0","intelligence":"2","wisdom":"0","charisma":"0","description":"Human-looking"},"elf":{"strength":"0","dexterity":"2","constitution":"0","intelligence":"0","wisdom":"0","charisma":"2","description":"Tall, slim, and pretty"},"dwarf":{"strength":"0","dexterity":"0","constitution":"2","intelligence":"0","wisdom":"2","charisma":"0","description":"Short and stocky"},"half-orc":{"strength":"2","dexterity":"0","constitution":"2","intelligence":"-2","wisdom":"0","charisma":"2","description":"Brutish and ugly"}};
Note that is you are using version 0.6.1 of the tool, you can do this with a normal {{ }} mustache: you don’t need the triple-stache. This ugliness in the first version is because of handlebars standard approach of escaping text – converting ” into " to be HTML-safe. But you don’t need to do that when making Roll20 character sheets, and it’s good to be blocked.
This output is not formatted quite as nicely as we can do if we do it manually, but the whole object is properly grabbed and turned into an object variable, which is what we want. We don’t need to know what it contains, and its automatically updated with any changes made in the data file.
Sheet Worker for Race Changes
We have seen many methods of constructing a data variable, but now we can assume we have it, and can proceed. Now lets use it to finish our project.
We need a sheet worker to detect when the race changes, and enter appropriate values in the new racial stat inputs.
The only handlebars step here is the stats line, where we grab the stats from the data file. Now that we know the JSONstringify method, we can happily use that.
    on('change:race', () => {
        getAttrs(['race'], values => {
            const race = values.race;
            const output = {};
            const stats = {{{JSONstringify stats}}};
            stats.forEach(stat => {
                output[`${stat}_race`] = races [race] [stat];
            });
            setAttrs(output);
        });
    });Code language: JavaScript (javascript)
In brief, this sheet worker grabs the race value from the race dowpdown. We create an output variable to hold all the attributes we are going to update.
The worker then grabs an array of stats using the JSONstringify method we just learned. There are other ways to do this, but it’s nice, quick, and simple. That gives us an array of the six stats.
Now with a standard javascript forEach function, we loop through those stats and add the attribute values we want to update each time race is changed.
We know stat names are in the format “strength_race”, “dexterity_race”, etc., so creating the stat names i seasy. We also now have a races data variable, and can grab properties from it using [name of object] [ field] [subfield] – we know that races [race] [stat] will give us a stat modifier.
This function does one thing: it assigns the stat bonuses for races. But we need to also add the temporary stat bonus to the racial bonus to getthe actual stat score. That takes a bit of rewriting.
    const stats = {{{JSONstringify stats}}};
    on(`change:race ${changes(stats.map(stat => `${stat}_base`))}`, () => {
        getAttrs(['race', ...stats.map(stat => `${stat}_base`)], values => {
            const race = values.race;
            const stat_bases = {};
            const output = {};
            stats.forEach(stat => {
                stat_bases[stat] = +values[`${stat}_base`] || 0;
                output[`${stat}_race`] = races [race] [stat];
                output[`${stat}`] = stat_bases[stat] + +races [race] [stat];
            });
            setAttrs(output);
        });
    });Code language: JavaScript (javascript)
Here we move the stats array before the sheet worker begins. Since it might be used for other things, we might move it to near the start of the script block for convenience.
We have already used the changes function before. We now want to update the attributes for any changes to strength_base, dexterity_base, etc. We use the .map function to convert an array of base stats to [stat]_base.
In getAttrs we use the same .map function, this time with the spread operator (…) to make sure the stats array is broken out into its six constituents.
The main change after that is in the stats.forEach loop. Here we need to grab the stat_base, and add it to the race bonus. That extra + is to make sure the race bonus is coerced into a number, so we end up with values like 12 instead of 102 (adding a number to a string).
Stat Total Calculations
This part is a little trick. We already calculate the bonus from the stat total, so this works as is with no further changes!
Refinements
At present the buff column adds to the stat modifier, and we want to modify the stat score. We can do that by changing the order of stat columns (putting this before the stat total column), and changing the way Stat Totals and Modifiers are calculated. It’s a pretty simple change now we know the structure, and needs no changes to the data file.
We can make further refinements easily if we need to it (like adding an extra stat modifier column).
There’s one extra handlebars change we’ll see that will affect nearly every sheet worker. This is already ridiculously long – Let’s save that for a future post.
In This File
- Grabbing data from data file using JSONstringify
- Saw triple-staches in use (triple brackets: {{{something}}}
- More examples of using
each, @last(there’s a corresponding@first),#if, else,and#unless, and of course@keyandthis. - {{{ }}} or triple brackets
- General mixing of handlebars and HTML plus Javascript.
Note: I could not have written this post without the help of PrimalZed, the creator of the Handlebars Tool. I haven’t included his Roll20 profile because I don’t think he wants to be pestered. But his help was invaluable here.
