- Setting Up The Handlebars Character Sheet Generator
- Basic Templating with Handlebars
- Handlebars Templating: Things Get Complex
- Handlebars Templating: What are Helpers?
- Handlebars Templating: When You Want to Stop Handlebars
- Handlebars Templating: Nesting in All Its Forms
- Handlebars Templating: Handling Generator Errors
- Handlebars Templating: Helpers
- Handlebars Templating: Partials
There are little bits of code that you expect to run multiple times, or expect to reuse in different projects. If you put them in a partial, you can run them again just by using the name of the partial.
Partials are not required. They are most useful the context of a normal webpage, where cutting reusable code off into pages that are called only when needed can save resources. But in a roll20 character sheet, the whole page is loaded at all times, so this benefit is not available.
Personally, I think the vast majority of times you might be tempted to run a partial you should probably resist the urge and do without. Put your code in the main handlebars file.
That said, there are benefits to Partials, especially when creating reusable code or code that is portable between projects, and one extra benefit, so we’ll discuss them here.
The Partials Folder
The handlebars tool has a place where you can enter a Partials folder. You can have many files inside that folder.
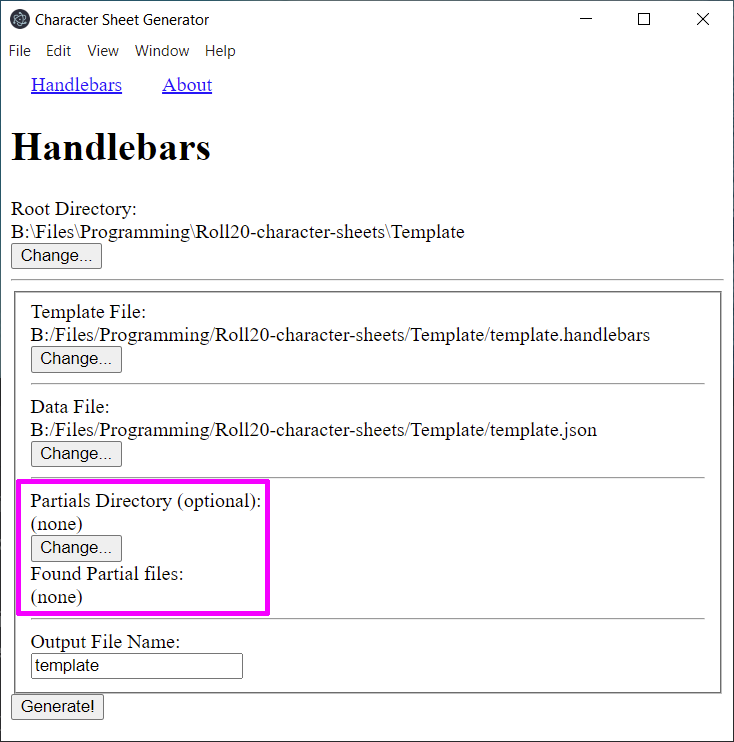
One gotcha for Partials is that folder doesn’t automatically refresh. If you add any new partials to the folder, you need to click that button again and reselect the folder (just click the Open button).
Once a file has been recognised, you can freely change its contents.
How To Use a Partial?
Each partial file contains the code for a single purpose. Every time you trigger the partial, all the code in that partial file is run. So, each partial file is a complete macro, function, thing – whatever you want to call it.
You create the partial file, then run it like this: {{> partial-name}}. That > symbol is used to say, “this is a partial, find the following file name and place its contents here.
Let’s say you have this code (I don’t, but I could):
Sheet Created by GiGs
Contact Email: cyberstarscape@gmail.com
Website: https://cybersphere.me/Code language: Handlebars (handlebars)
You want that to appear in every character sheet project, but don’t want to type it every time. Solution: write that one, put it in your partials folder and name the file something like id.handlebars. Now you can type this where you want it in your file:
{{> id}}Code language: Handlebars (handlebars)And when you click the Generate button, the complete text of that Partial will be inserted in the generated html file.
You could add styling and html elements to that original partial, so you get the code exactly how you want it, and the HTML insert will include all those bits too.
Partials as Macros
So, you can insert a bit of code that you use a lot. Let’s say in your code, you have two separate tabs and much of the character sheet is duplicated in each tab. You could create it once, with all handlebars, html, and JS code, place it in a partial, and then call it in both tabs with something like {{> partial-sheet}}.
But remember that the html sheet will be rebuilt every time you hit the Generate button, so if there is any extra code, and different code, between those tabs, you’d be best off splitting that partial into several different sections – for before the unique code and after that unique code.
As a more practical example, lets say you have tabs for “Main PC” and more tabs for “Supporting Character”, and another for “NPC Extras”. Each tab has different things on it, but they all have a section for name and appearance (the bio tab), and for hit points and damage (the health tab). So you create two partials: bio.handlebars and health.handlebars, and in each include all the code for those things.
Then in each tab you add {{> bio}} or {{> health}} where it’s needed. It’s really that easy.
Partials with Parameters
But you can get more complicated. You can pass data to a partial, and write the partial to incorporate that information. For example, you notice that sheet workers often start the same way:
on('change:stat1 change:stat2, event => {
   getAttrs(['stat1', 'stat2'], values > {Code language: JavaScript (javascript)
and ends the same way:
    });
});Code language: JavaScript (javascript)
That last one never changes, so you could call that with, say, a file called end.handlebars, which would look like:
{{> end}}Code language: Handlebars (handlebars)It’s debatable if this would be quicker to write, but you’d never forget those brackets or type them in the wrong order.
Now for the first one, the stats you use do vary, which means we need to accept a list. Here’s one way to do it:
{{> worker atts="stat1,stat2"}}Code language: Handlebars (handlebars)We need to create a name for the partial (here worker.handlebars), and a variable name to hold the stats. This example uses “atts“. Then you can type a list of stats that must be enclosed by quotes and separated by a comma. So this could also look like:
{{> worker atts="strength,dexterity,constitution,intelligence,wisdom,charisma"}}Code language: Handlebars (handlebars)You can type any number of stats (there’s another way to do this, which will be described shortly).
Now the Partial would look like this:
on('change:{{replace atts "," " change:"}} sheet:opened', (event) => {
    getAttrs(['{{replace atts "," "', '"}}'], () =>{
Code language: Handlebars (handlebars)
This worker receives that atts in the format listed. But remember when it is recieved it is just text and we can apply code to it. Here the replace helper is used twice, first to change those separating commas to “, change:” and the to change those commas to “‘, ‘” so that we get the right format for the event line and getAttrs.
It’s often a pain to type change: many, many times in bigger sheet workers with lots of stats, and this makes that process automatic.
Using the Data File
You have data file which might include multiple stats already, So if you need a worker which uses those stats, you can have a different Partial that handles those. For example, we have the 6 stats in a data entry called, appropriately enough, stats. We could call the partial like this:
{{> worker atts=stats}}Code language: Handlebars (handlebars)Notice it is much shorter, and there’s no risk of typos – the stats are already written out once, why not reuse them? We can take this further and have a data entry for workers, like:
{
    "workers": {
        "a": ["a", "b", "c", "d", "e", "f", "g", "h"],
        "b": ["stat1", "stat2"]
    },
    "stats": ["strength", "dexterity", "constitution", "intelligence", "wisdom", "charisma"],
    "stat_columns": {
        "Stat": {},
        "Score": {"name": "_base", "base": 10, "readonly": ""},
        "Race+": {"name": "_race", "base": 0, "readonly": "readonly"},
        "Total": {"name": "", "base": 10, "readonly": ""},
        "Buff": {"name": "_buff", "base": 0, "readonly": ""},
        "Bonus": {"name": "_modifier", "base": 0, "readonly": ""}
    },
    "skills": {Code language: JSON / JSON with Comments (json)
Here we create an object, workers, and create a sub-section for each set of stats we want to use. We can still call stats because it’s right there, but if we want to call a sub-entry we use this format:
{{> worker atts=worker.a}}Code language: Handlebars (handlebars)Wed probably want to use short names – but this means we need to type the fill set of stats in only one place.
The actual worker partial in this example would need different (and more complex) code:
on('change:{{join atts ' change:'}} sheet:opened', event => {
    getAttrs([{{#each atts}}'{{this}}'{{#unless @last}},{{/unless}} {{/each}}], () =>{
Code language: Handlebars (handlebars)
We use different helpers. Since the list of stats is stored as an array, we need to use the join helper on the event line to convert them into a string. The default delimiter is “,” but we change it to ‘ change:’ so that each entry in the array gets that before it.
On the getAttrs line, the sheet worker already accepts an array, but we need to make sure it’s in the correct format – so this code turns it into a string (remember, at this point, its just text), and adds ‘ at the start of each item, and ‘, at the end of each item, and uses the unless helper to get rid of the final, trailing comma.
Now we have a partial that will create those first two lines of a sheet worker, that are almost always the same – perfect for a Handlebars partial.
Commonalities and Differences
Both of these Partials examples are based on the idea that you always have the same stats in the event line as the getAttrs line – this isn’t always true, but it is so frequent you can use a Partial.
If you want to use both these partials, you’d need to change the name of one of them, and you probably wouldn’t use them for every sheet worker. Also, the syntax when using repeating section attributes is different on the event line and the getAttrs line – this is solvable, but you might use yet another Partial. There’s no problem with this approach – you can have as many Partials as you want.
You can include more parameters. We have included atts= for the list of attributes, but you could also include a parameter for whether the eventInfo attribute is included, and whether this worker needs sheet:opened. These could be different Partials, or you could add extra conditional statements to show this in a single Partial. There’s a lot of room for experimentation.
Partial Documentation and Examples
You can find some examples of Partials at PrimalZed’s Proof of Concept page, and the official document is largely impenetrable, but shows other ways of using Partials. Ignore any reference to registering partials – that is done automatically for you with this tool, when you add a partial to the partials folder.
Final Concern
Remember that Handlebars runs in its entirety first, building the HTML file, and then the HTML file runs. So a variable created in HTML or JS cant be used in the Handlebars – there is struct ordering to account for. This is also how handlebars does some of the things it can do (treating what is an array in JS as a string in Handlebars, for example).
I mention it here because I often forget this, and you might too.
